
If you somehow missed the party of the year (aka Indie Bridal Party) then you missed the amazing Ribbons & Bluebirds running an AWESOME DIY station to help pimp our DIY wedding workshops, and give attendees a little taste of her mad DIY skills. Today we are sharing the DIY project that Jenn ran at IBP, so you can make them at home, yourself.
Now, the paper flower is nothing new – but Jenn’s tutorial gives us a fresh look at an old favorite – using water colored paper! This slight addition to the tutorial makes the paper flowers a bit more modern, but just as beautiful as if you use maps or sheet music. Take it away Jenn!
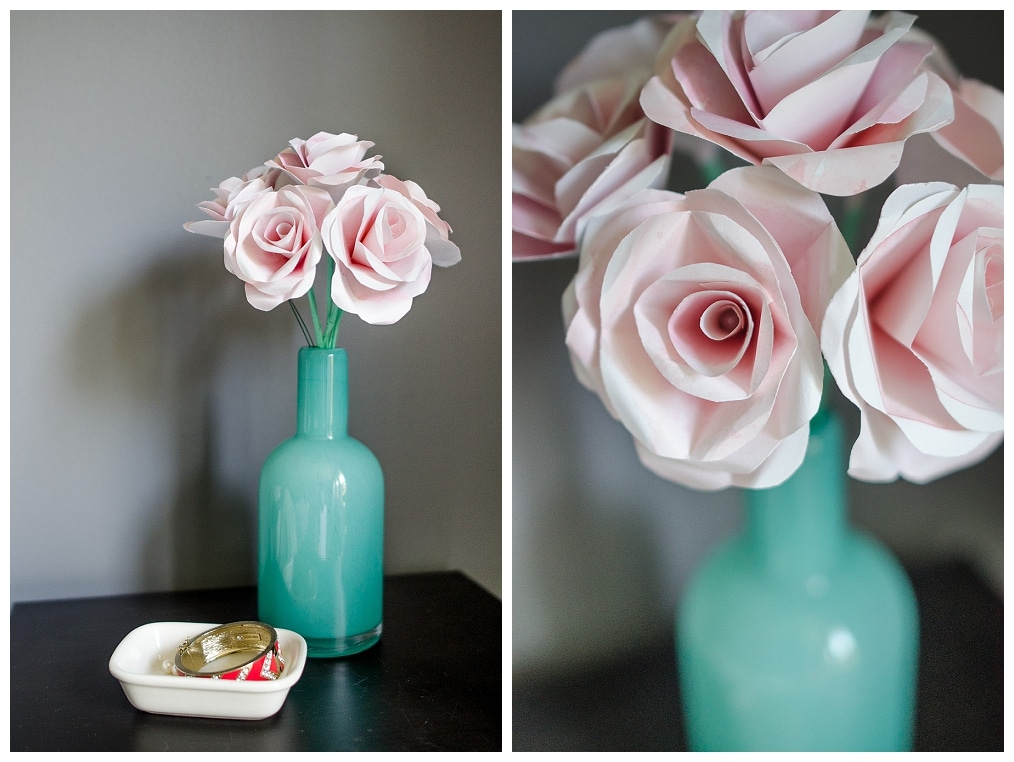
DIY Tutorial: How to Make a DIY Water Color Paper Rose
What you’ll need:
- Paper of your choice – standard printer paper works fine like this HP Color Inkjet Paper
. Using anything much heavier than that might make the flower stiffer and harder to shape.
- Glue – We like: Elmer’s Craft Bond Fabric and Paper Glue
- Scissors
- To put the flower on a wire, you’ll need a length of floral wire and a bead about 1/8” diameter. We like: FloraCraft 20-Gauge Wrap Stem Wire, 18-Inch, White
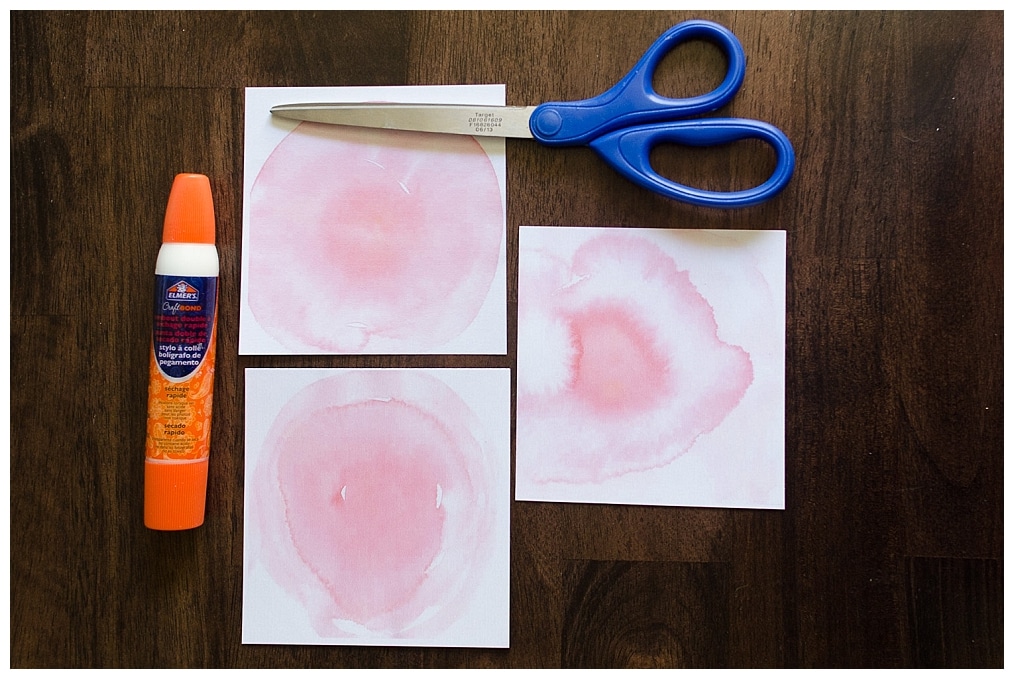
These paper roses are so easy to make, and come out looking great! They don’t take too long to make either, so gather some friends and a bottle of wine or two, and soon you’d have a pile of paper roses for wedding décor! (Check out the corsages and boutonnieres from Eliza and Josh’s wedding posted last week – you too can make these cool roses!) You can use any paper you like – I used a very simple splash of watercolour in the center of these sheets for some colour, but you could try sheet music, wrapping paper, book pages, origami paper, newsprint, and more!

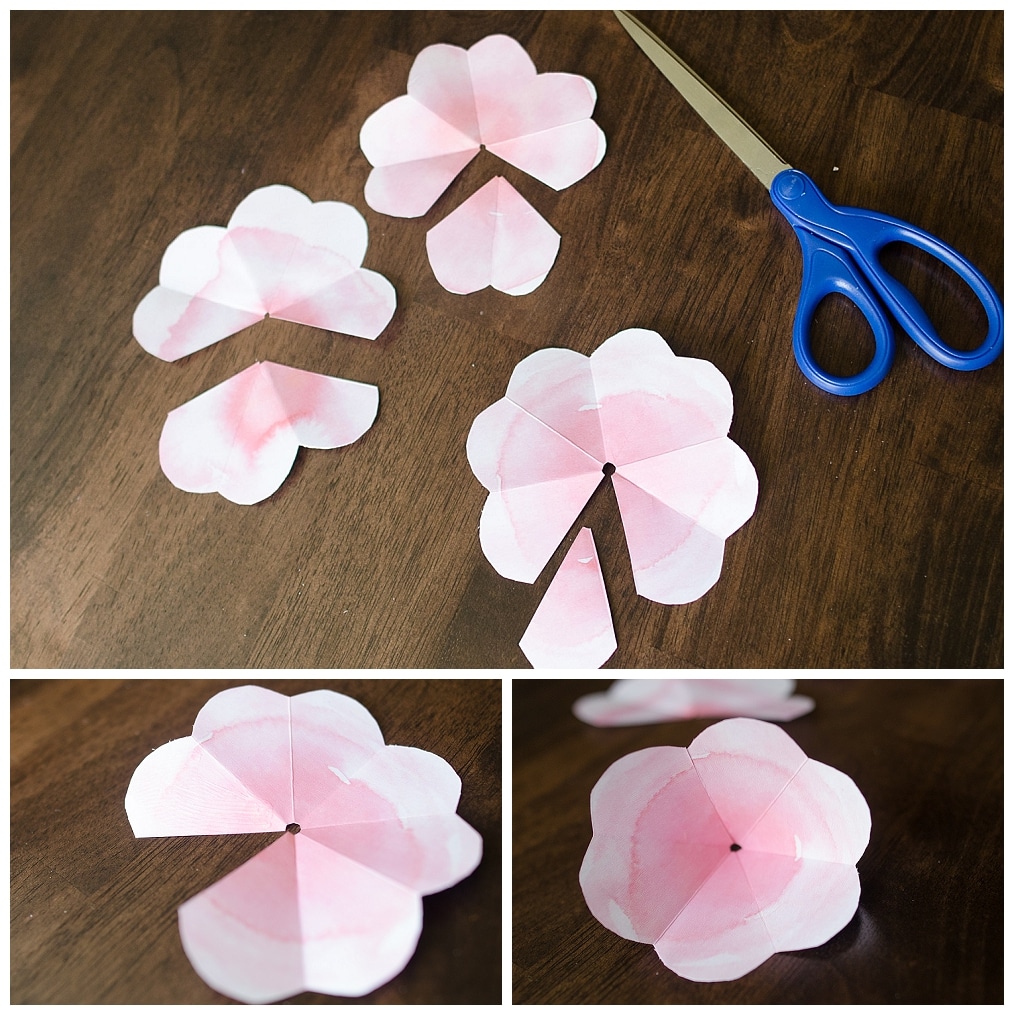
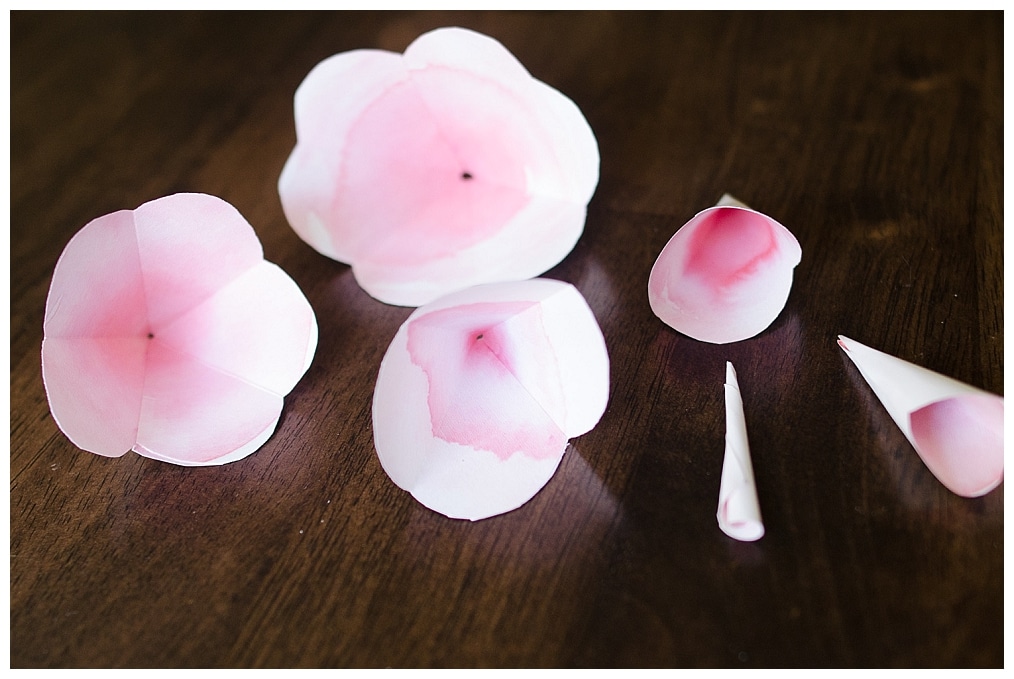
Start with 3 paper squares, at least 4” across. Start with one, and fold it in half corner to corner (with the paper design on the inside). Fold in half again and half again, each corner to corner, until you have a triangle with folds along two edges and an open top. Just like making snowflakes or paper hearts in elementary school, cut off the top of the open part into a rounded-top petal shape and cut JUST THE TINIEST AMOUNT off the bottom corner to put a hole in the center. Repeat with all 3 squares.
Unfold your petal-triangles into the flat little flower shapes they should now be. If any of the holes in the center are more than about 1/4” across, you’re going to want to recut them – the smaller the center opening, the easier to stack your layers later! It doesn’t have to be a pinprick, just don’t try and use a layer with a ½” hole in the middle.

From your first paper flower layer, cut out one petal along the fold lines. For the second, cut out a chunk of 2 petals (1/4 of the flower) and for the third, you guessed it, cut out a chunk of 3 petals! Save all the smaller pieces you just cut, as they’re going to form the center of your flower.
Click inside for the rest of Ribbons & Bluebirds’ DIY Paper Rose tutorial!
Apply glue to one petal of each of the larger pieces, and overlap to form each layer into a cone. When you’re finished, you’ll now have layers with 4, 5, and 6 petals. For each of these 3 pieces, gently roll the rounded petal tops back to let the flower “blossom” a little bit – this results in a fuller and more natural looking rose.
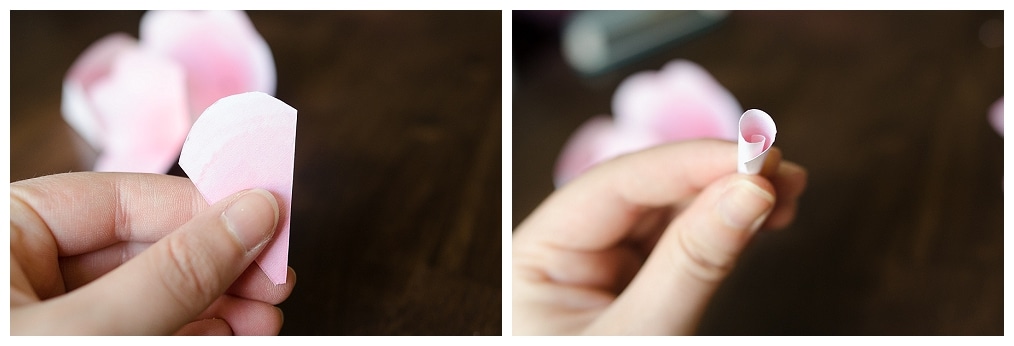
For the inside of the flower, start with the smallest individual petal piece and roll into a cone. Glue along the edge to hold it in this cone shape. For the two and three-petal sections, overlap just a bit of the edges and glue to form cones for each of them.
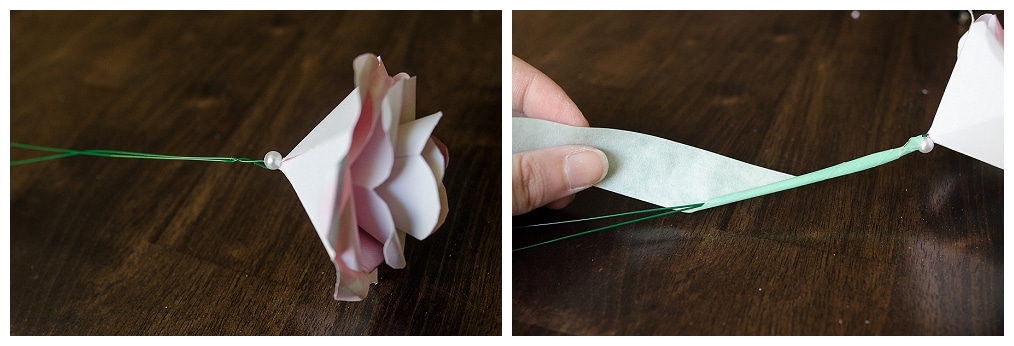
Now you’re ready to assemble! If you’d like to put the flower on a wire, take a length of floral wire and fold it in half loosely. Take a bead at least 1/8” across and slide it done one half of the wire so it sits in the center, then twist to secure it. Now slide your first layer, the smallest single-petal cone, onto the wire so that the bead will wedge inside the cone and prevent the wire from sliding out.


Apply a small amount of glue to the very bottom of the first layer, then slide the two-petal cone onto the wire and hold to allow the glue to set. Repeat with layers 3-6, rotating each layer as appropriate to try and alternate petals and gaps.

When you finish gluing the flower together on the wire, one way to keep it extra secure is to slide an additional bead on one half of the open wire ends, then twist the other wire strand around to secure it. For a fuller, finished stem look, you can wrap the wire in floral tape or green masking tape.

All done! To make a bouquet like this one with 6 or 7 flowers can be finished in a short half-hour, and there are so many ways to personalize using your own paper design ideas!
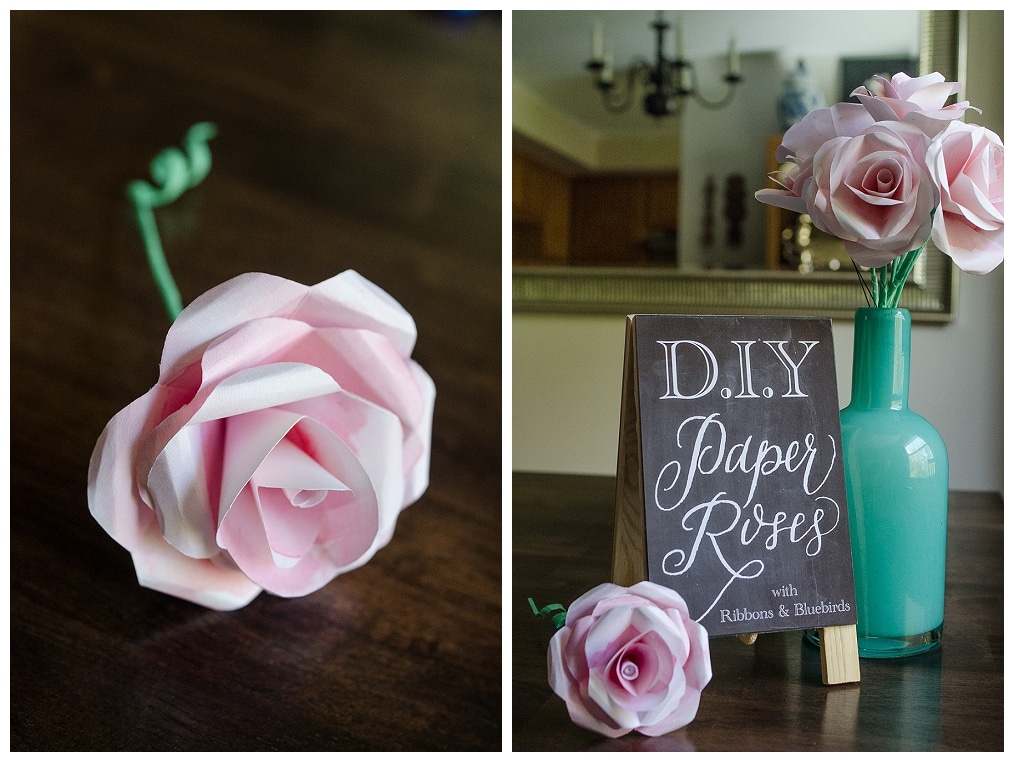
A really big thank you to all of the lovely people who stopped by the Capitol Romance DIY Table at the Indie Bridal Party last week – you were all wonderful! And as promised, here is your handout so you can reference how to make these fun paper flowers anytime!
[icon size=”small” image=”icon-heart”]


27 comments
Totally saving this blog! I love paper flowers :)
what if I don’t want to put it on wire
What kind of paper did you specifically use and how did you do the water color effect, i have alot of trouble using watercolor and couldn’t figur out how you got the effect you did.
Hi Lucia – feel free to email me or Jenn at Ribbons & Bluebirds to get more info/help!
Oh, I love these! Thank you for sharing <3
Hugs
Frida
http://www.fridaspeach.wordpress.com
I used these to make boutonnieres for my debate team out of our flow paper because we at a tournament for the winter formal :( and they look adorable! I just did mine on a string so I could attach them to a ribbon and it worked perfectly! Thanks for this amazing Idea.
Omg im part of debate too! ill try this out, would make a great gift for my coach!
any way to get some more pics of the folding? Mine ends up looking very weird–rounded like petals only on two sides, instead of all around
James – you’re cutting along the wrong edge. Make sure you cut along the folded part. I will try and get some additional pictures!
Hi,
I definitely saw what you meant after that. Just finished the first one now and am working on a stem now! This is my first DIY project, and I’m absolutely certain I’m going to wow my girlfriend with these. I mixed in a little scent with the water for the water color, and they smell amazing now too. Thanks for the help!
Boyfriend of the year right there – you got this!!! :)
I just made these out of book pages for a fellow book lover. I have been searching for ages for a project that doesn’t take days, but also doesn’t look like an elementary school project. These turned out so beautifully, thank you!!
I am having trouble making the water color splash and can’t seem to recreate the look you made. Please help me.
They took forever .. but there were perfect! Thank you so much for the tutorial.
(I wish I could share a picture ..)
Wow… Doing centre pieces for best mates wedding… they look brilliant (wish I’d found this earlier!). They look so real.
Thank you
Thank you for your lovely tutorial!!I’m gonna try them;)
I love these thanks for sharing it has added a lot to my life. My husband will love it.
I just diy a paper rose by this tutorial. And it was successful. Thanks for posting !
Hi!
I don’t think Ribbons and Bluebirds link works anymore. Do you by chance have a hard copy of the pdf you can email to me?
Thanks!!
Ahh Brittney! Thanks for letting me know – Jenn updated her branding and website … let me get that from her! Can you email me!?
Hi I was also trying to get your link to work for the diy watercolor paper rose directions handout. Could you email it to me? Thank you so much!