Images & Tutorial: Tre Bella
So freakin’ excited to have a DIY Tutorial back on the blog! I wish I was crafty enough to bring you guys more myself, but alas, I am not (nor do I really have the time), so thank goodness, for guest submissions :) Today we have Kim, the founder of stylish & affordable wedding venue out in Arizona, Tre Bella! Kim shares a simple, yet beautiful tutorial using Eucalyptus to create hanging decor for your home or wedding. I’d love to see this as a ceremony backdrop (which you could then re-purpose in your home after the wedding). Before we get to the DIY, don’t forget the Coffee & Conversations industry event tonight as a part of #DCWeddingWeek — there are just a FEW tickets left & I hope to see you there :)
Here we go!
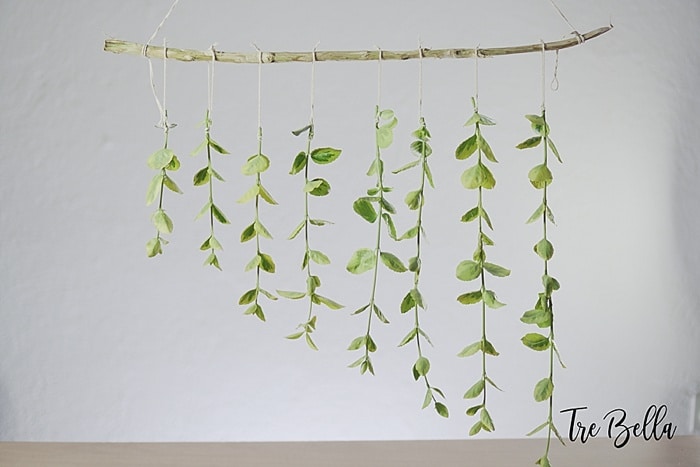
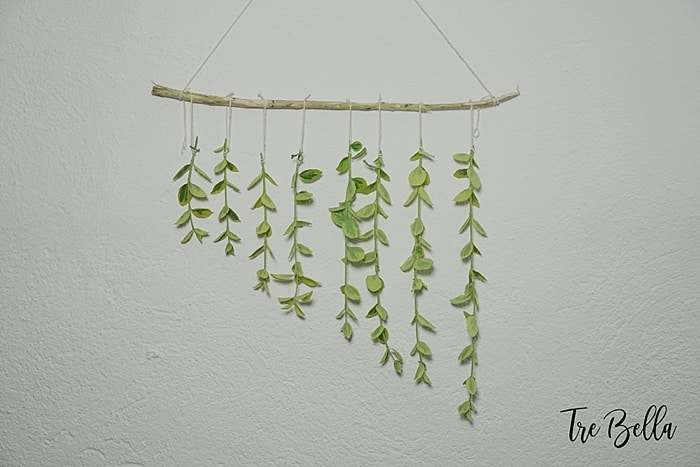
Beautiful, simple decor is what I live for. It’s a cornerstone of the all-inclusive service we offer at Tre Bella, a stylish and affordable wedding venue in Arizona that I founded. So I’m always on the hunt for creative new ideas my couples can incorporate. Right now, eucalyptus is in – so this one is inspired by that.
The beauty of this minimal eucalyptus hanging decor isn’t only in how simple it is to make, but in the versatility of how you can use it. Create it as wedding decor, then repurpose it for your home! Whether it dangles as an overhang from the ceiling or lays flat against the wall, this piece can decorate the ceremony, reception and anything in between.
What To Expect
Time: 30 minutes – 1 hour, depending upon size (once supplies are gathered)
Difficulty Level: Easy.
Cost: $2 and up. Scissors and thread can often be found for $1 at a dollar-type store or for a bit more at a higher quality craft shop. The branch and greenery can come free from your own backyard or for a modest price at the local nursery or craft store (artificial versions).
Supplies & Tools

For this simple DIY project you will need:
- 1 Strong, dry wooden branch
- Greenery branches, such as eucalyptus
- Sturdy white string or thread
- Scissors
Decide on how petite or massive you want your hanging decor to be. Think about the space in which it will appear to factor in scale. Based upon this consideration, you can choose the length of wood and number of branches you’ll need.
If your branch is darker than you’d like, you can peel off the outside layer of bark to reveal the inner branch’s natural cream color. If you like the darker, rustic tone of the bark, you can leave it on.
Step 1 – Arrange
Visualize the pattern in which you want your greenery to be displayed – increasing in size, randomly placed throughout or coming to a peak height in the middle or at the edges. Then, arrange your greenery branches in the pattern you prefer so that they are laid out in the order in which you’ll need to slide them onto the wooden branch.
So, for instance, if you are looking to create a cascade of branches from short to tall, then you would arrange your greenery by size; in order of the longest branch to the shortest branch.
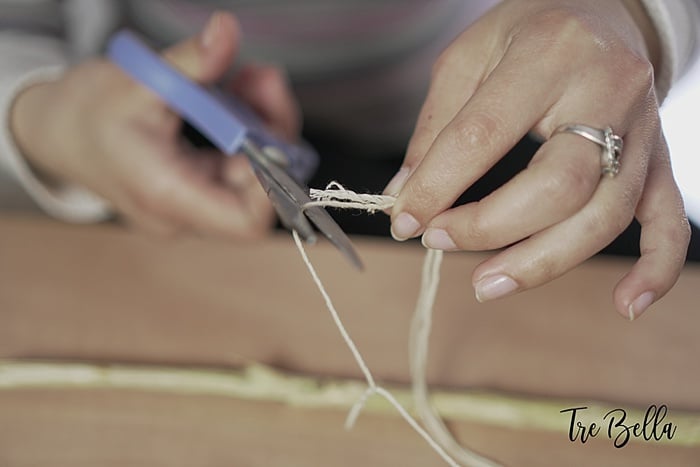
Step 2 – Cut

White thread was used in this example, but you can choose any color string that works with your decor plan.
You will need to cut one piece of thread for each branch of greenery you’d like to hang, approximately 10 cm each, depending upon how much space you want between your green branches and the main wood branch. The same size of thread for each piece of greenery should work well.
Step 3 – Tie
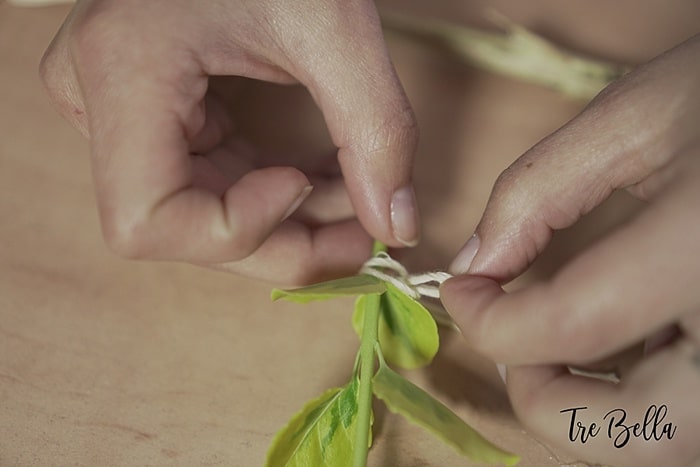
You want to tie the thread two times; once to secure the green branch to the string and once to create a loop to
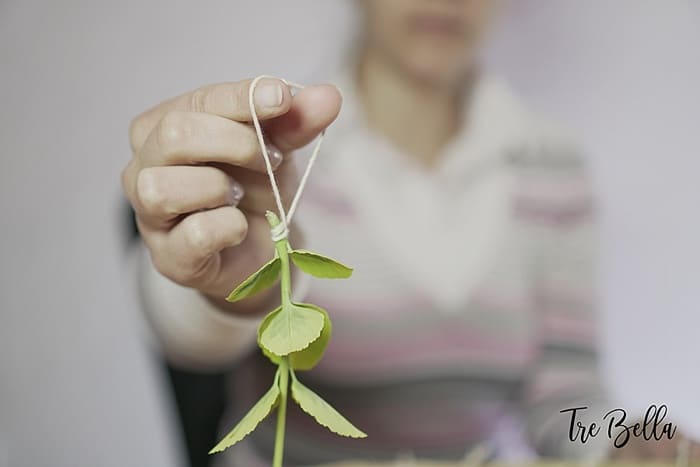
First, tie a loop around the top of the greenery branch to hold it in place when hung.
Second, tie together each end of the string into a knot. This will create a large loop through which you can slide the branch onto the wood.
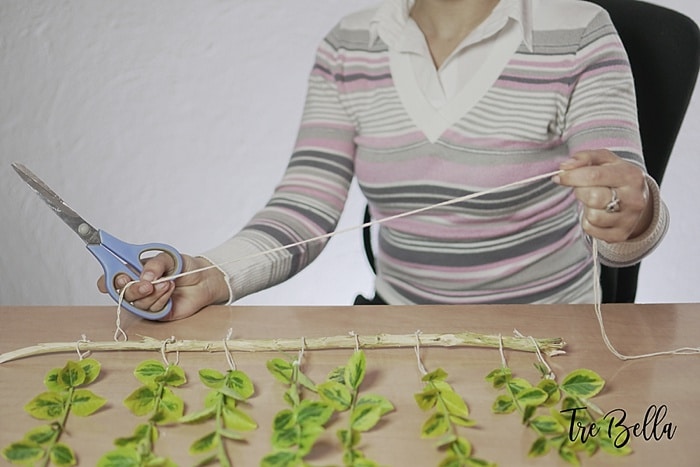
Step 4 – Attach & Hang


Now, it’s time to tie the green branches to the wooden one. With loops in place, slide each branch of greenery onto the wood in the order in which you want them displayed. Since you have already arranged your branches in the order you want them displayed, you can attach them in that same order.
Be sure to leave enough space between each branch to create a balanced look.
Step 5 – Hang
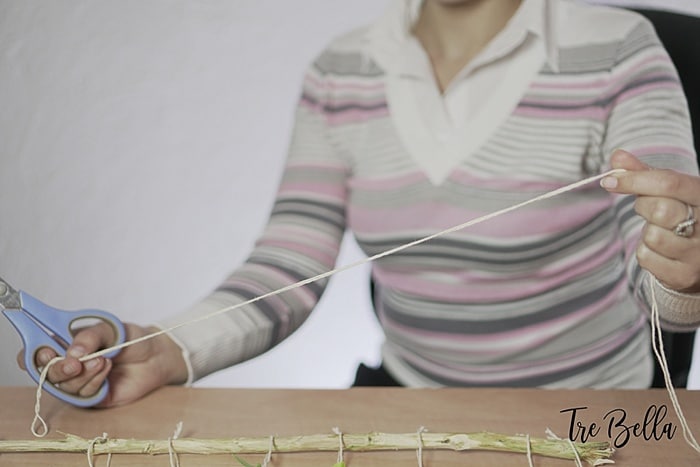

In this final step, we need to add a hanging mechanism to be able to attach the decor to a wall or ceiling hook.
Cut a length of thread that is roughly twice the length of your wooden branch. For a stronger hold, double up on the string.
Tie each end of this longer piece of string to each end of the wooden branch, 1-3 inches inward from the edge of the branch to prevent the string from slipping off.
Voila! You can now hang your decor on a nail or hook.
About the Author:
Kim is the founder of a stylish and affordable wedding venue in Arizona, Tre Bella. With a refined eye for design and an impeccable coordination process, Kim is passionate about keeping platinum-level weddings stress-free and within reach for busy couples.