

Images & Tutorial: Ribbons & Bluebirds
And we’re back with Part 2 of our DIY Storage Ottoman tutorial. Part 1 is back over here, which shows you how to make the box portion. Now Jenn is back for the second part – how to upholster your ottoman! Take it away Jenn.

If you started with a cube already or you followed along with our DIY Storage Ottoman Part 1 tutorial, we’re ready for part 2: tackling the upholstery.
Upholstery can be intimidating, but it’s not hard! Once you pick up a few tips and techniques, and you get a feel for the fabric you’re using, you’ll be upholstering like a pro. On that note, if you love upholstery projects I can’t recommend Design Sponge’s Upholstery Basics series enough – they do a fantastic job of walking you through the professional method for a bunch of projects step by step.

Materials, should all be available at your local fabric store:
- Storage ottoman box, (buy: Home Basics Storage Ottoman
, or make yourself from our Part 1 DIY Storage Ottoman Tutorial)
- Furniture feet, from Part 1
- 1” High Density Foam
(I used 2 yards, 24” wide)
- 2” High Density Foam
- Dacron batting (I used just over 2 yards at 54” wide
- Outer fabric – yardage will depend on fabric width. I used 3 yards of fabric at 42” wide for my ottoman, which was slightly larger than the dimensions we used in Part 1.
- Felt or other heavy lining fabric
- Ribbon or other trim for finishing
- Fabric covered button kit, 7/8” size
Tools needed:
- Staple gun (I use a light-weight gun and it works great without killing my hands.)
- Marker/pen
- Hot glue gun
- Spray glue
- Xacto knife
- Fabric scissors
- Kitchen paring knife
- Fabric glue
- Sewing machine
- Straight pins
- Iron
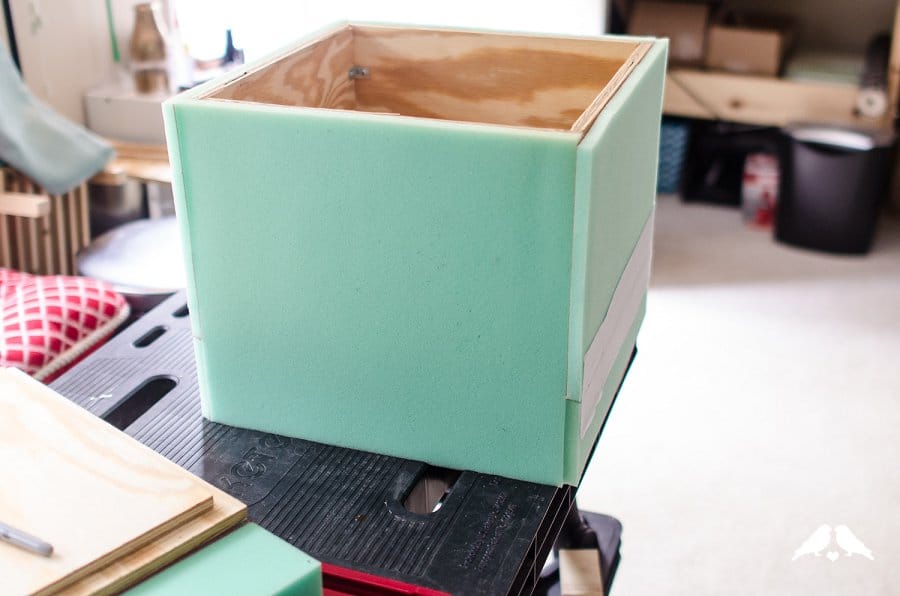
So when we left off last, we had a bare box with the hardware installed for furniture feet, and a separate lid. Now it’s time to finish it off with cushy foam padding and fabric.
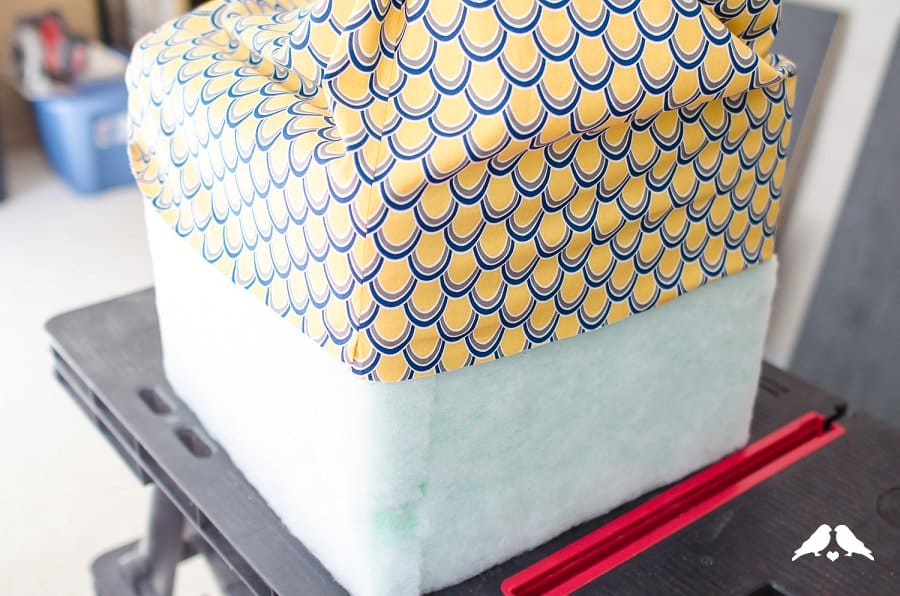
Lay your box on the 1” thick upholstery foam, and use a marker to trace the size you need. For the first two pieces, measure the foam to exact the size of the panel (should be 12.5”wide x 11” tall), and cut using a pair of sharp, heavy-duty scissors. Use spray glue to attach the foam panels to the sides of the box, on opposite panels.

Use the box, now with two sides covered in foam, to measure out the longer sides for your second pair of panels, to overlap the first corner – these should be approximately 14.5” wide but can vary based on how accurate the rest of the your construction has been. Attach the third and fourth panels to your box with spray glue. If you don’t have enough foam in a continuous piece to cover a side, you can splice two pieces together to form the full panel: just cut the two pieces you need and use spray glue to attach a thin piece of fabric over the joint. When you’re finished with this step, the outside of your box should be covered in 1” foam.


For the top, take your piece of 2” foam and trace the exact size of your top piece. Cut this piece out – it will be more difficult to keep your cuts straight vertical, but it can still be done with the fabric scissors.

CLICK INSIDE FOR THE REST OF OUR DIY STORAGE OTTOMAN TUTORIAL – PART 2!
I chose to make a tufted top, but if you want a flat one skip this step (and the later steps that mention the tufting, or buttons.) For the tufting, draw diagonals on the foam to mark the center location. Measure out from there to form diamonds: my diamonds are 4” across and 6” tall, so I marked cut points 2” to the left and right of the center, and 3” to the top and bottom. Continue setting out the pattern to form additional diamonds or half diamonds as space allows- – as I have mentioned before my ottoman is slightly larger than the dimensions I gave at the beginning of part 1, so if you need to modify the spacing of the tufting to get the correct distance for yours then please don’t think you’re violating some kind of traditional spacing rule! Cut holes in the foam at each of the tuft corners using a kitchen paring knife or x-acto.


Attach the 2” foam to the board top with spray glue, and then use more spray glue to wrap the exterior in a 1” foam strip to bring the top even with the rest of the foam box. I did end up using some smaller pieces here but didn’t bother to cover the joints with a fabric splice because I decided the seam would not show.

The next step will be to cover the foam with the Dacron batting. I started with the top, and used my staple gun to staple the batting to the underside of the top, about ¼” from the inner lip piece. At the corners, just cut away the excess batting in a straight line to avoid overlap, and staple closed. When the batting is stapled securely all the way around, flip the lid over and use your finger to poke holes for your tufting.


Continuing with the top, it’s time to get out your finished fabric! Cut a generous piece of fabric with 2+ extra inches around each side for the top (Tip: you can use your finger to push extra fabric into the holes, to get a sense of how much extra you really need.) Start with one of your two central tuft holes and push fabric down to the bottom with your finger. Pressing hard with your staple gun into the center of the hole, fire a staple to attach the fabric to the plywood. This may take a few attempts to get the hang of, but it will work I promise!

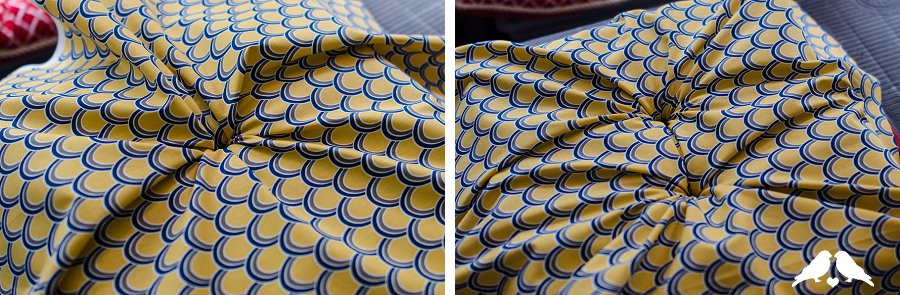

Moving on to the next tufting hole, pull the fabric tight from the first one and try and pleat the distance with a straight fold of fabric. Repeat the push and staple technique, and continue to work outwards from the center tufts.
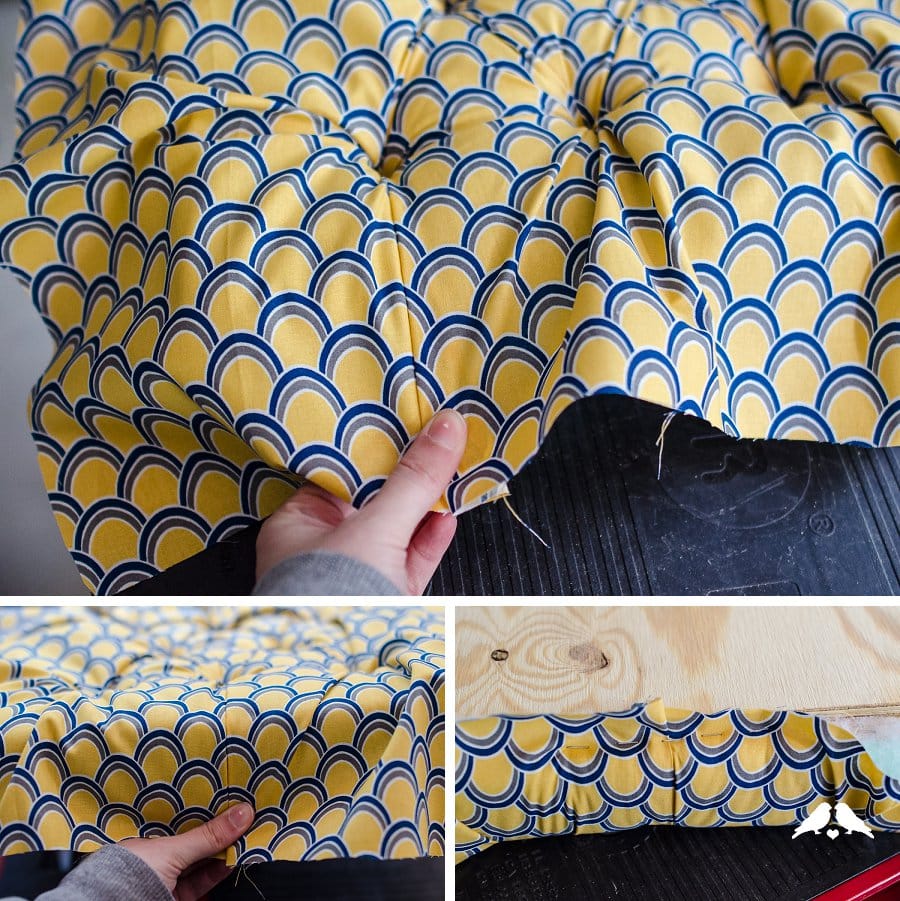


To finish the fabric edges, start with one of the top or bottom center tufts, and pull the fabric together in a straight line pleat. If you have a crazy patterned fabric like mine, try and match the pattern. Staple the pleat firmly to the underside of the lid, as close to the lip piece as possible. Repeat with the opposite tuft, then pull the fabric taut on the left and then right sides and staple, so you should have pulled the fabric taut and stapled on the center of all four sides. Then rotate around the top stapling, pleating where necessary, keeping the fabric tight and even. At the corners, make a box pleat (like you’re tucking in the bottom corner of a bedsheet) – fold the fabric corner around to one side, then flip the fabric flap down to cover the excess and to form a straight line at the corners. Staple underneath, and trim any excess fabric.


Before covering the box portion in batting and fabric, remove your kitten if necessary.


Wrap the outside of the box in batting, leaving excess at the bottom only. Let the ends meet in an un-joined seam – the batting will stay put over the foam as long as you’re careful when wrapping the box in fabric. Staple the batting at the bottom, and trim any excess from the top.


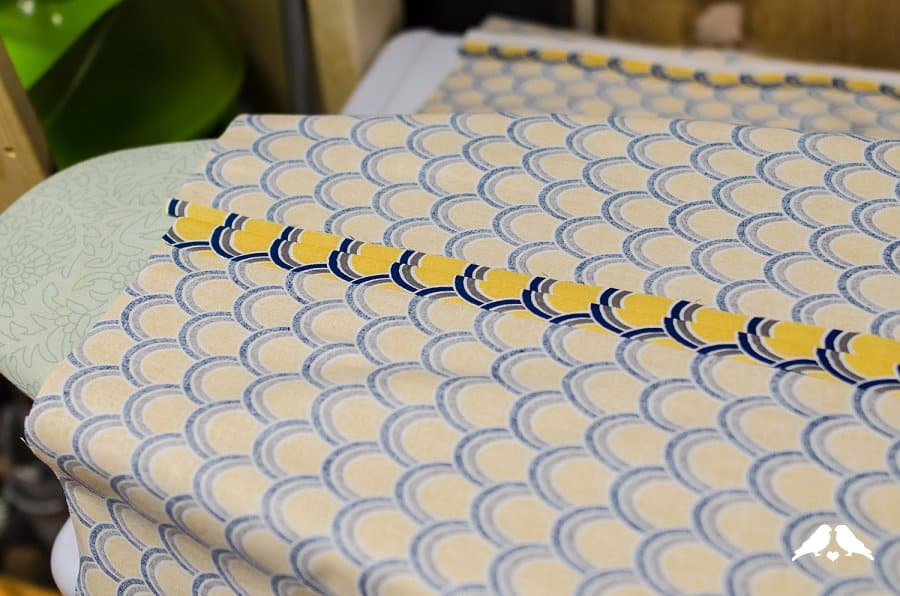
Lay out your fabric for wrapping around the box. Based on the pattern and the width of the fabric I chose, I needed to splice a panel of fabric to the width to get a piece long enough to wrap all the way around. If you need to do this too, just match up the pattern as best you can! Once you have a piece that will wrap all the way around the box, good side down, pinch the ends of the fabric together until the wrap is taut but not overly tight, and insert a straight pin to mark where your seam should be. Remove the box from inside the fabric, and use straight pins to secure the fabric for sewing. You’re making a giant open-ended tube here, that you’ll slide down over the box when it’s finished.


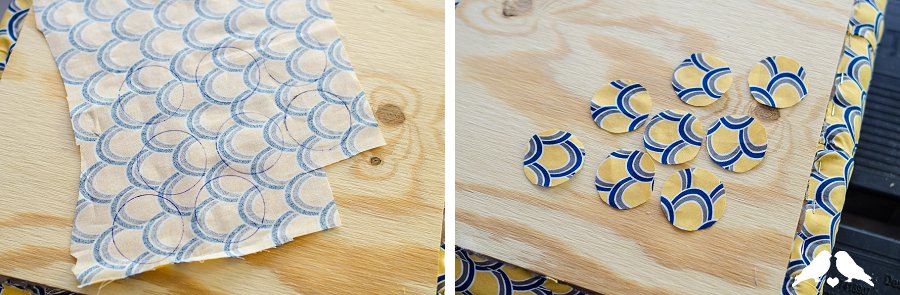
DO NOT throw away your fabric scraps after this step – you’ll need some to make fabric covered buttons.
Use your sewing machine to sew down your line of pins, being careful to keep your seam straight and align the pattern if possible. Trust me when I say I am the most basic sewing machine user ever – sewing a sort-of-straight line is about the max of my capabilities. Make sure you iron the seam open and flat after sewing to avoid lumps in your upholstery, and while you’re at it iron any other creases out of the tube you’ve just created.

Starting with the bottom up, carefully pull the tube of fabric over the ottoman, making sure the loose edge of batting doesn’t pull away. If possible, line up your seam(s) at the corners.

If you have a patterned fabric, use the against the lip of the box to make sure the pattern is level/even and begin stapling from the inside-center of the box. As with the lid, start in the center of each side and staple outwards towards the corners in sequence, keeping your fabric even and straight. When you get to the corners, pull the center of the fabric into the corner, and staple on each side to keep everything as flat as possible.


Now that the fabric is secured to the inside of the box, flip the ottoman to bottom-up and staple to the bottom, again starting in the center of each side and working your way out to the corners. This time make sure you’re pulling the fabric tight all the way around, and again if you have a patterned fabric, make sure you’re keeping the pattern even all the way around. At the corners, pull the center of the fabric in and staple at the corner first, then fold each side down and staple over the center piece. Make sure your staples on the bottom don’t cover or extend past the t-nuts for your furniture feet, but it’s fine if your excess fabric does since you can trim that later.


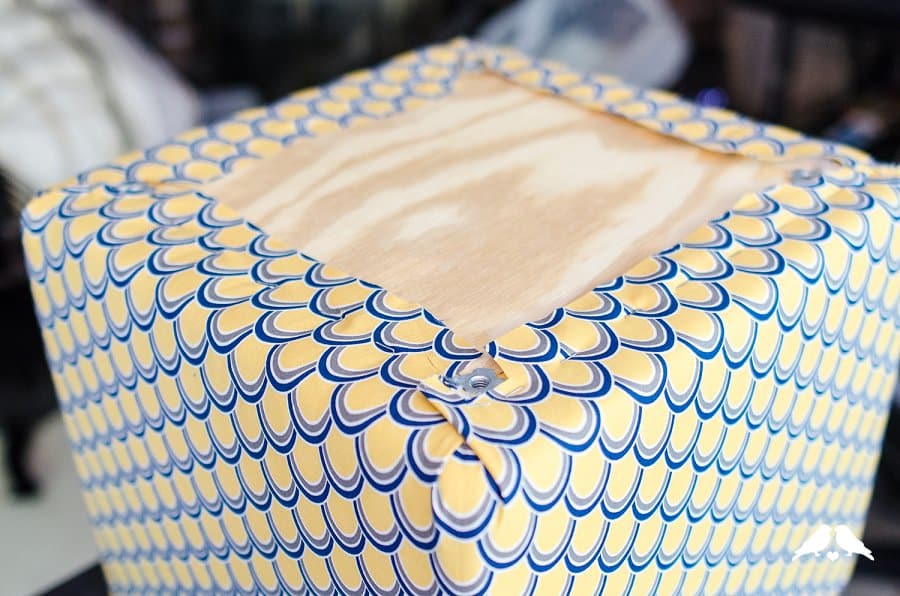
Time to make fabric covered buttons for the top! Traditionally these buttons would physically be holding the tufting in place, but since we have a piece of plywood behind ours, they’re strictly ornamental. Your local fabric store, or favorite online retailer, will have fabric button kits you can use to make these super easily: the kits contain all the pieces you need. I used a 7/8” kit. Use the template provided to trace circles of fabric to cut out of your scrap fabric, then cut them out. Making the buttons is simple: lay the fabric over the mold, and place a metal button cap overtop. Push the two pieces into the mold and gather the extra fabric into the middle. Place the inside of the cap on top of the excess fabric, then press the inside down into the cap until you hear it snap and lock into place.

My tufting design needed 8 buttons. After I’d made the buttons, I adhered them by using fabric glue (although super glue would work too), centering them over the tufting hold and gently pushing down until the glue engaged. Now you’re completely done with the decorative fabric on the outside, and all you have left is the lining!


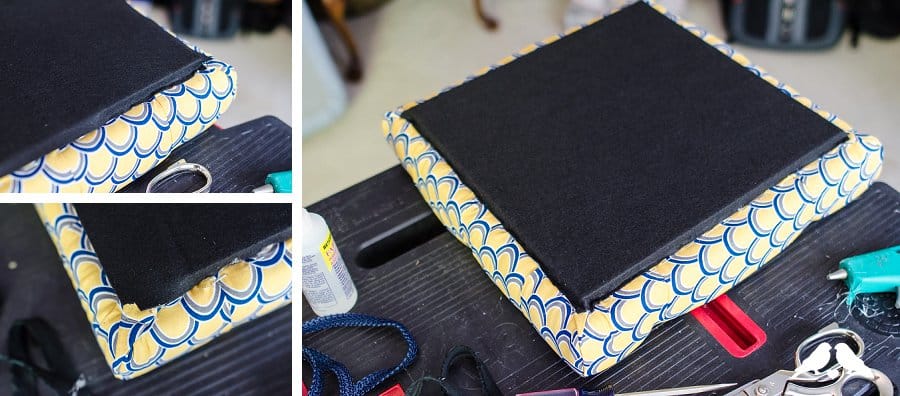
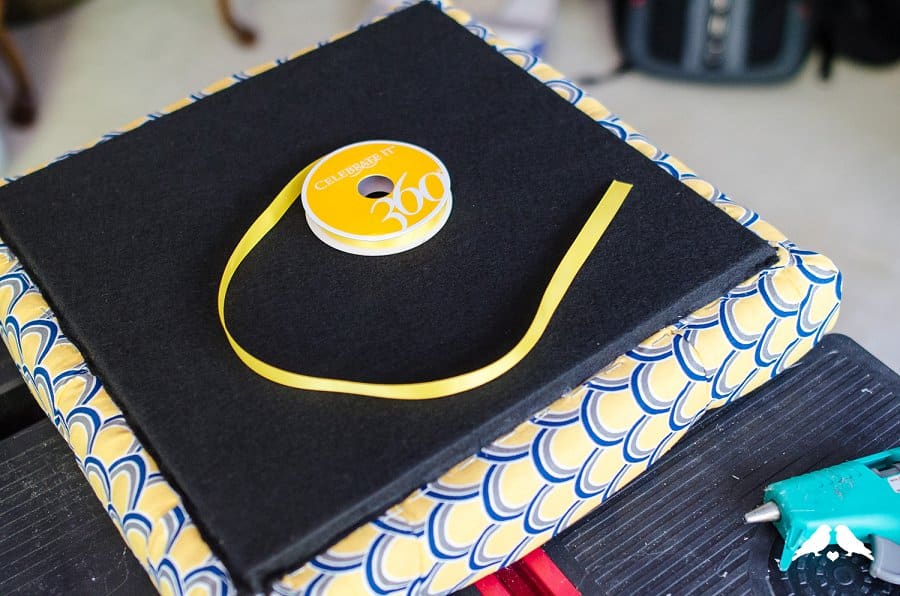
Start with the top, because it’s simpler and will get you used to working with the felt. Cut a square of felt big enough to wrap over the top lip piece, fold down to cover the exposed sides, and stop roughly at the line of staples for the outer fabric. Use spray glue in the center to attach the felt loosely, and smooth the fabric flat out towards the edges. Use the edge of the lip piece to create a crease in the felt, then glue the flap down with hot glue all the way around. Clip the corners of the felt as needed. Once the felt is firmly attached, cover the seam with a ribbon or other piece of trim and hot glue.


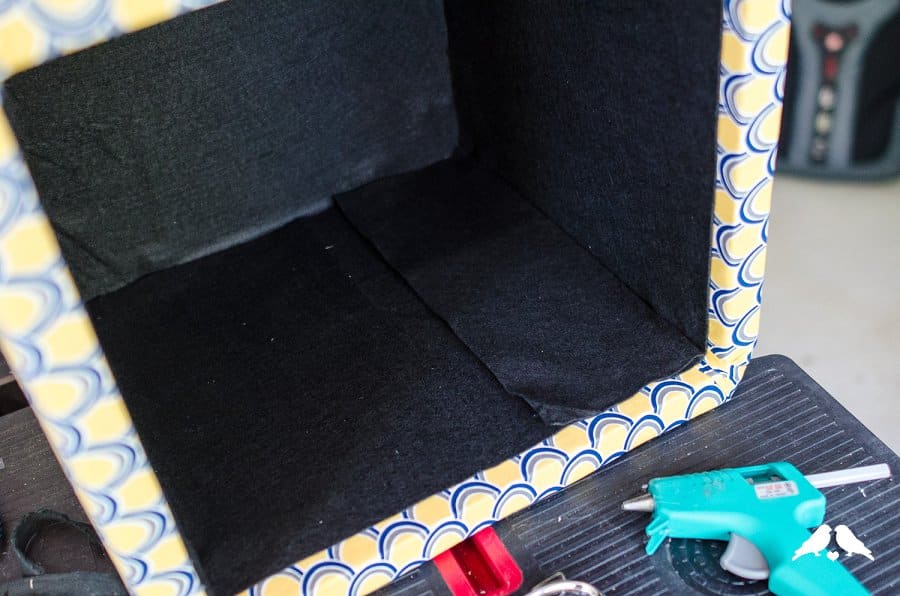
For the inside, start with a piece of fabric large enough to cover the bottom and extend at least ¼” up each side. Don’t worry too much about it being incredibly flat or smooth – with the angle braces on the inside, there is a limit to how flat you can get the felt. Use spray glue to attach the bottom piece, and smooth it down as much as you can. Next measure from the bottom to a height that will cover your staples from attaching the outer fabric, and cut a strip of felt at this height long enough to wrap all the way around the inside. Working from one panel to the next, use hot glue at the top and bottom edges to keep the fabric flat and adhered to the inside of each panel. When you get to the end, trim any excess felt and use hot glue to attach the seam.


Last but not least, the bottom! I suppose you could skip this, but since everyone who moves the ottoman is likely to grab it from the underside, I wanted to make very sure that we stay splinter-free J Cut a last square of felt offset from the edge by ½” or so – ideally you want it to completely overlap the staples, and the t-nuts. You may want to clip the corners at a diagonal. Use spray glue in the middle to hold the square in place, then use an x-acto or similar to find the t-nut holes in the corners. Push the thread of your furniture feet through, and pin the corner in place by screwing the foot into the t-nut. Repeat with all 4 feet, and use your hot glue gun to secure the edge of the felt all the way around.


Phew, you’re all done! Thanks for sticking around through this long tutorial – and let us know what fun spaces you think you could make a storage ottoman for!


3 comments
Thanks for this!!! I am looking to make one and love how detailed your tutorial is. Yours turned out adorable!!! I hope mine looks half as good.
our pleasure!
Looks great! Is it possible to add some type of hinge to the top?