
Images & DIY Tutorial: Ribbons & Bluebirds
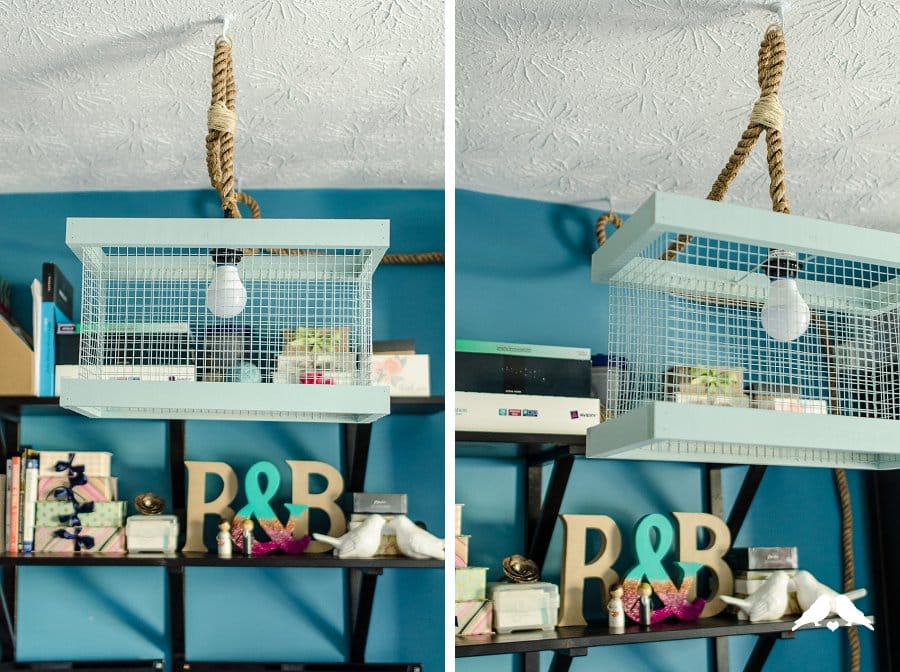
We’re breaking into our expanded scope today with this AWESOME DIY tutorial from Ribbons & Bluebirds. While this lamp could make a cook cardbox or something for your wedding, I think it would look SUPER rad in an office, bedroom, or nursery! Jenn changed things up this time and broke out the power tools – building this entire DIY pendant lamp from scratch – that’s right, no lamp kid, or “start with old lampshade” here. Power Tool N00bs don’t fret though, Jenn was sure to include a TON of workarounds within this tutorial in case you don’t own or like power tools!
DIY Tutorial: How to Make a DIY Pendant Lamp

From Jenn:
I have been in the process of moving my office into our guest bedroom for quite some time now, and one of the things I’ve been focused on was bringing more light to my new space. Our house doesn’t have overhead lights in any of the rooms (thanks, 1987) but has switched outlets instead. As a solution in a room where I have need of every spare surface and square inch, I have installed a plug-in pendant swag kit to bring an overhead lamp to my desk space. I splurged on the swag kit and bought a fancy rope one, so I decided against paying for an expensive lampshade – time to DIY! I was pretty frustrated that every lampshade tutorial I could find online began with the words: “Take your old lampshade…” since I didn’t have a frame to start from! So I had to get a little inventive with my lampshade hardware, but it was worth it: new (awesome) lampshade, from scratch, for under $16.
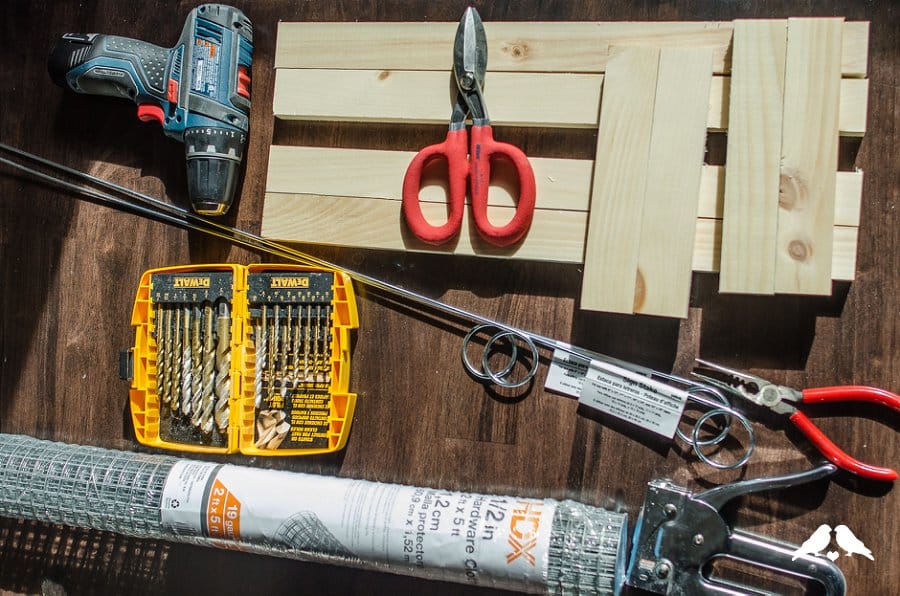
Materials, all available at your local hardware store:
- ½” hardware cloth
- (1) 8’ long piece of 1×2” lumber
- (1) sign stake – see style needed below
- Twine
- Spray paint (optional)
Tools needed:
- Saw
- Staple gun
- Tin snips or wire cutters
- Nail gun OR corner brace hardware and screws
- Power drill and 5/16” drill bit
- Hacksaw for cutting metal sign stake
Instructions:
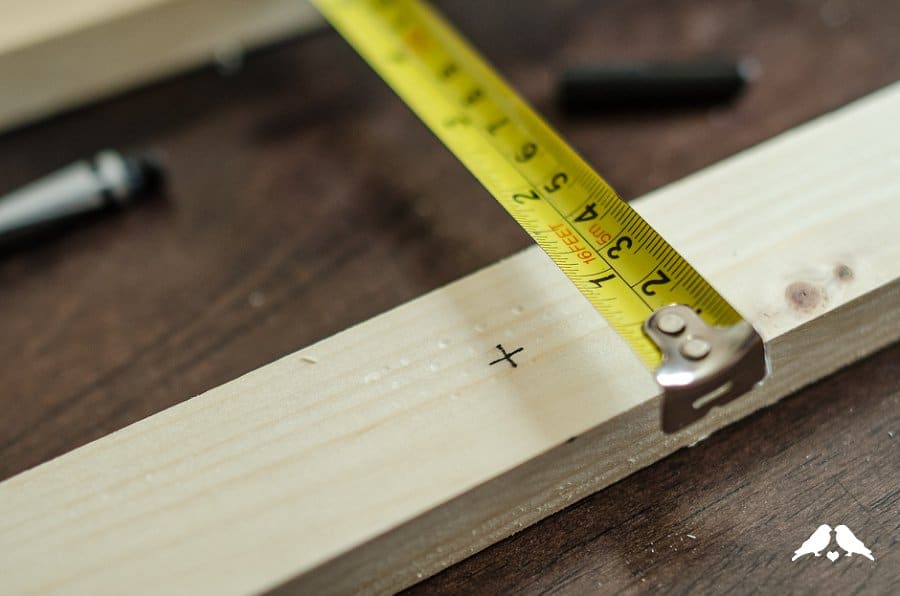
Start by cutting your 1×2” piece to length. You’ll need 4 pieces each for the top and bottom of the lampshade – my long sides are 18” long and my short sides and 6.5”, but decide what proportion & size is right for your project and hanging space. Many hardware stores have a cutting table for buying trim and other lumber by the foot, so if you don’t have a saw at home you can cut it right in the store. Try and keep the pieces identical in length, so that they fit together nicely in 90 degree corners.

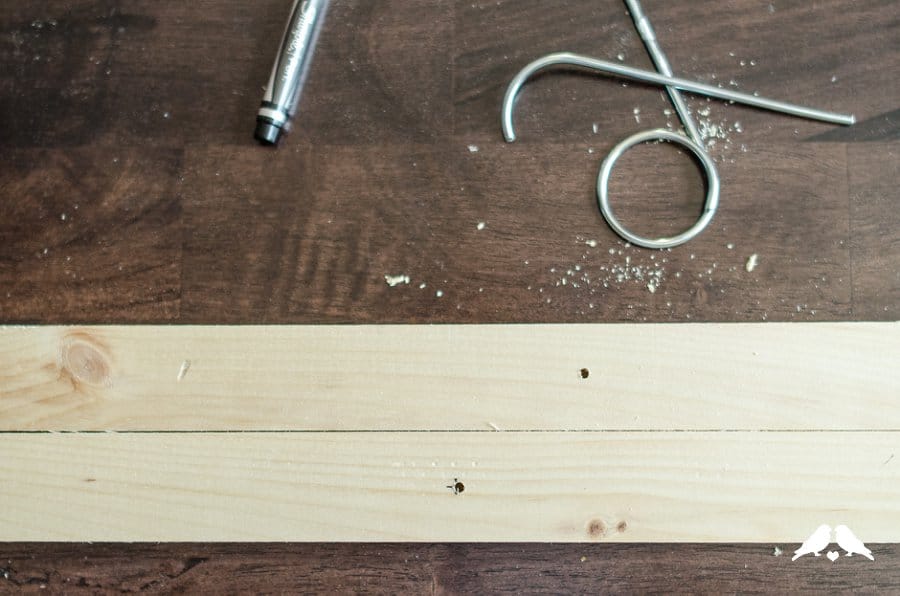
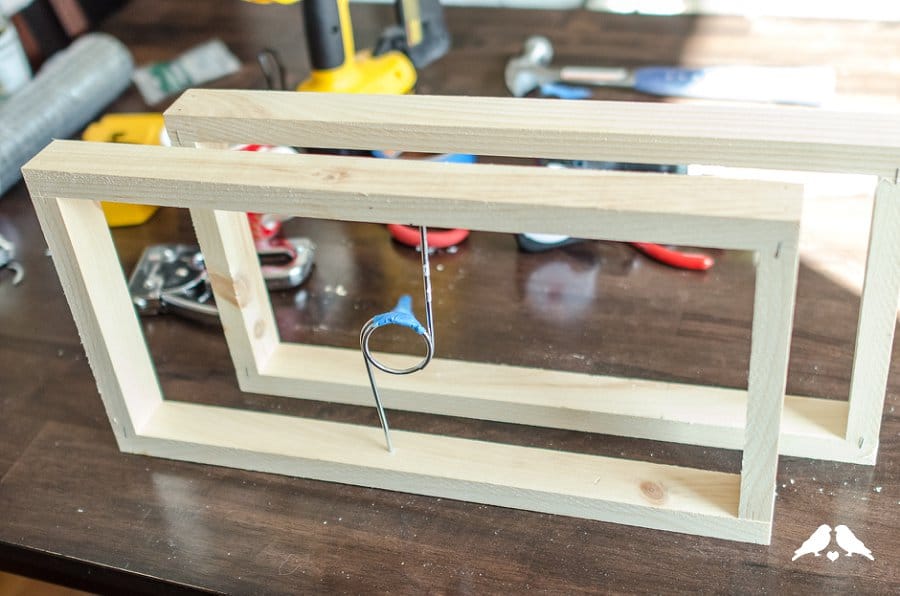
Before you assemble the frames of your lampshade, you need to make the hardware for the pendant to string through. Because of the rope on the cord of my pendant wire, I needed to be able to string the lampshade over the bulb socket and hold it on with a screw, so the circle suspending the lampshade needed to be fairly large. I found these sign stakes in my local hardware store and realized they’d be perfect.
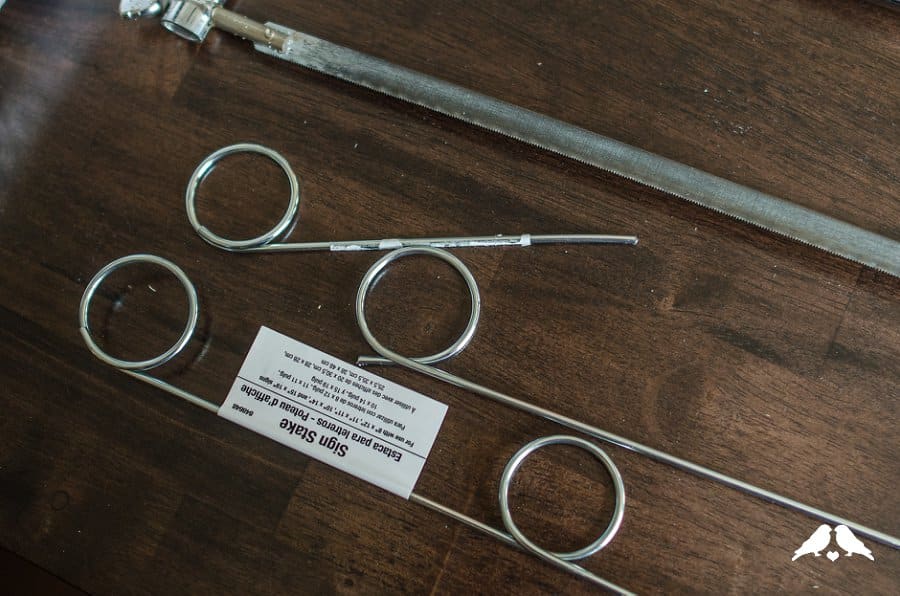
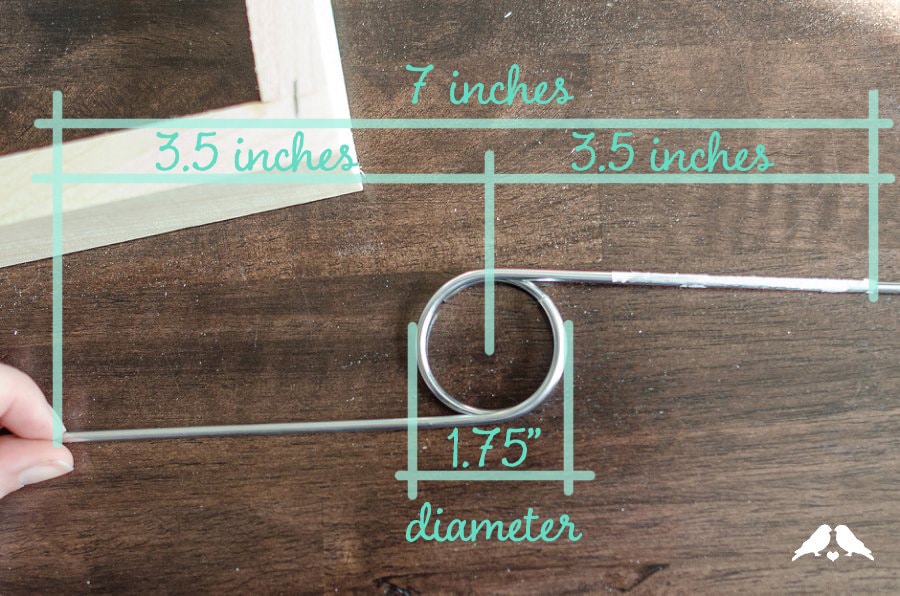
Cutting the sign stakes was the most annoying part of this whole DIY, so bear with me. The center of the circle needs to be in the center of the lampshade, to keep the shade balanced, and my plan was to suspend the two halves of the sign stake by embedding them in the middle of the long side of the top frame. Since my short side of the frame measured 6.5,” and I wanted to embed at least ¼” of metal into the wood frame, I knew that together the pieces needed to be at least 7” long with the circle in the exact center. Each stake had two circles, with enough straight in between to get the length I needed – I marked from the outside edge of the circle down the straight piece 4 5/8” (7/8”from outside edge to center + 3.5” center to end of embedded length) and cut using the hacksaw.
Click inside for the rest of this DIY Pendant Lamp Tutorial!
If you’re not familiar with a hacksaw: This is a tool commonly used to cut metal, and it is really the right tool for this job. You won’t need to saw cleanly through the whole diameter of the stake – once you get about halfway through you can bend the wire and it will break off.
To drill the holes for the stakes to fit into in the frame, I had to do repeat a bit more math. Because of the way the straight part of the stake comes off the side of the circle and not the middle, I knew that I would need to mirror the two halves around the bulb as a centerline to balance the shade. Again the circle measured 1.75” diameter, so I knew that the straight sides of the stake would need to be mounted at 7/8” from the centerline (with 1.75” between the two.) I measured on each piece of wood, and centered the marks in the middle of the 2” side of each piece.
Using a drill bit that matches the diameter of the stake wire (mine was 1/8”), drill holes into your long frame pieces.
PRO TIP: To avoid drilling through a piece of wood when you only want a hole partway through, measure down the tip of your drill bit the length of the hole you want (in this case, ¼”) and mark the line with a masking tape flag. This way, when you drill, you’ll know exactly when to stop!

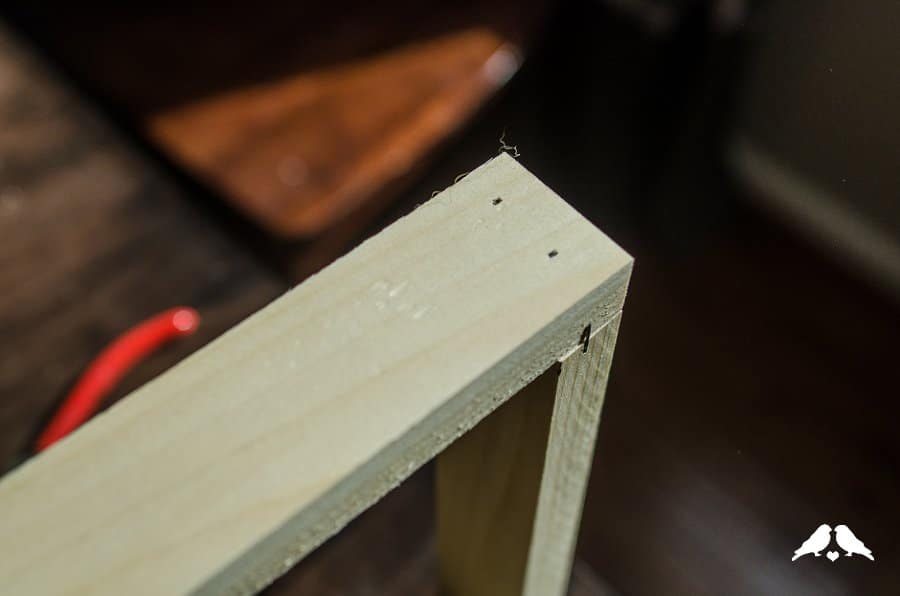
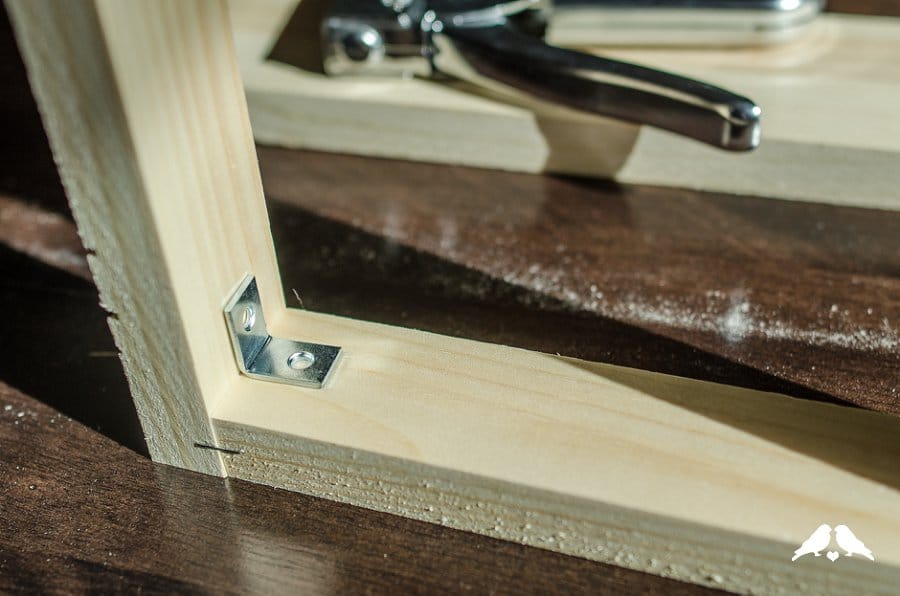
Now that the metal hardware to hang your shade is cut and you’ve drilled to be able to install it later on, you can construct your top and bottom frames. Making sure the holes you’ve just drilled are on the inside face of the frame, lay your pieces together and attach at the corners temporarily using a staple gun. This helps keep things aligned nicely while you attach them permanently – using either a nail gun (my favorite!) or corner brace hardware. To attach using corner braces, simple install one at every inside corner towards the top (which will give you room to staple your mesh later.) With a nail gun, remember safety first – use caution, safety goggles, and NEVER point it at someone. Ever.


Now that the frames are assembled, you can roll right into attaching the mesh. You may want to wear gloves for this, or just be careful not to scrape your hands. I cut a strip of hardware cloth off the roll about 10” wide and about 4’ long, using the grid of the cloth as a guide and my handy tin snips. I didn’t cut it exactly to the right length because I wanted to overlap the mesh at the seam rather than possibly have a gap at one of the corners.


Once you have a strip of hardware cloth that is the right height for your lamp, start by pre-folding the mesh to shape to fit inside your frame. Lay the mesh against the inside length to see which vertical line fits closest to the inside of the corner, and “fold” the mesh at that line. You’ll end up with a rectangle of mesh that fits snugly just inside the frame, with a little bit of overlap at the end.

Time to staple! Start at the top with the hanging wires in place so that you don’t accidentally block the holes, and use the grid as and alignment to make sure the piece is in straight. Staple across the vertical wires just underneath the top horizontal wire, starting in one corner and making sure the mesh is flat and straight as you go. Repeat in a circle all the way around the inside of the top frame, and then repeat with the bottom frame. When you’re finished stapling, you’ll want to tie down the overlapping ends of mesh so they lay flat and aren’t noticeable. I used the wire the hardware cloth was wrapped in for packaging, and wove a little piece along the corner to keep the two pieces firmly together. Your lampshade is almost there!


To finish up, I used twine (any kind of string will work here) to bind the two halves of my wire circle together at the top where they overlap, and used a touch of hot glue inside the drilled holes to keep them firmly embedded.


I finished it off with a touch of spraypaint, and then went right upstairs to try it out in my office! This project is super easy with a few tools, and could be adapted for other things too – without the complication of the wire hanger at the top it becomes a cute little centerpiece container, perfect for candles and flowers!


