
Today kicks off another DIY wedding tutorial series from the ever-talented Ribbons & Bluebirds. This time around she’s sharing 3 alternative (and awesome) cake topper DIY tutorials! Jenn shares, “I have been waiting for these next several tutorials for a while – I’m so excited to share them with you! All of these toppers are perfect to personalize and make your own.”
Let’s do it.
DIY Wedding Tutorial: How to Make a Mini Bunting Cake Topper
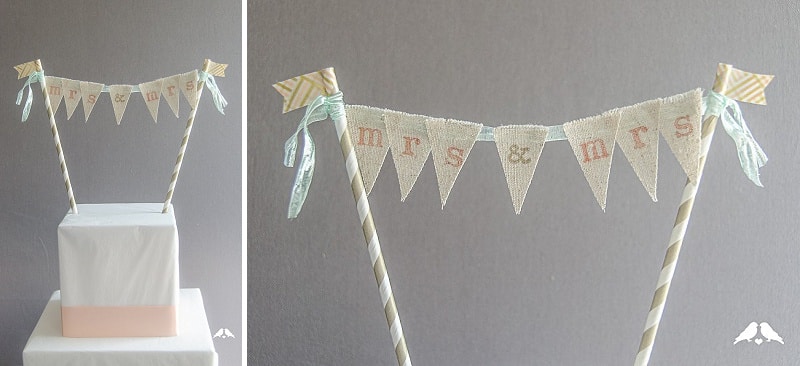
This bunting banner is rustic and simple, and totally charming. It would be just as easy to space the flags and use your initials, or have it say “cheers”, or whatever you would like!
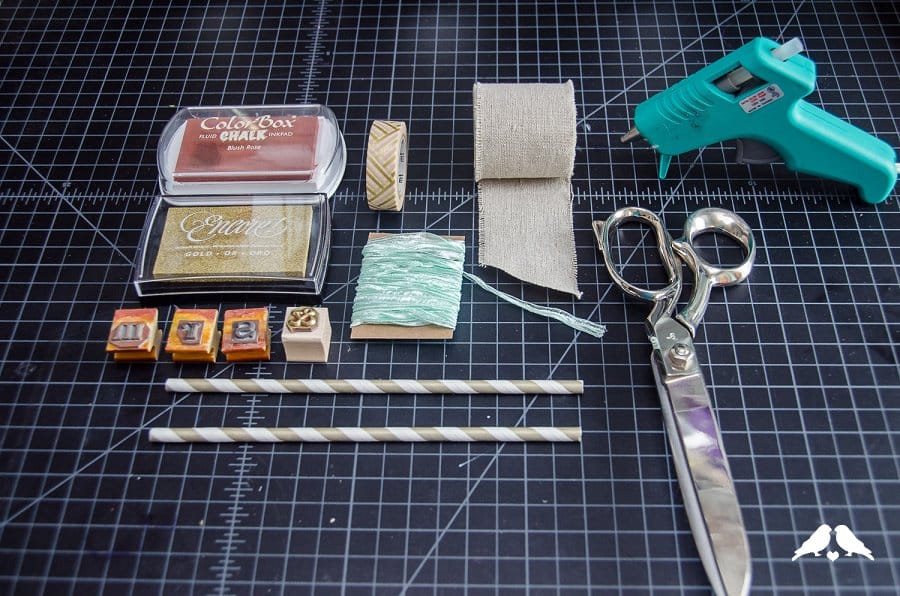
What you’ll need:
• Paper straws or equivalent – I prefer the straws over bbq skewers or similar because of the visual heft of the wider diameter for the posts
• Twine or ¼” wide ribbon for banner – mine is from Thatch & Thistle.
• Washi tape
• Linen ribbon/strips about 2” wide – I got mine from Paper Source.
• Hot glue gun
• Alphabet rubber stamps & ink
Step by Step Instructions:
1. The first thing to do is attach the washi-tape flags to the top of your banner poles – this helps you make sure you affix the ribbon for the banner at the same height down on each pole. To make a washi flag, tear off about 2” of tape and fold over the straw to tape to itself. Then, cut a little “v” notch on the ends. In the final design, you want the flag ends to aim out, away from the center.

2. Use your hot glue gun to attach the ribbon or twine to the straws. Start by placing a thin line of glue on the back, and affix the end of the ribbon. Then wrap your ribbon around to cover the cut end, and place a second small dot of hot glue as you wrap to keep the wrapped section from unwinding. Repeat for the other straw, leaving about 6” in the middle for your bunting.

3. Once my center ribbon is secure with hot glue, I like to tie separate little ribbon ends around the paper straws just under the washi flag – I think it makes it looks more festive to have the drape-y ends

Click inside for the rest of this adorable, and easy DIY Cake Topper tutorial!
4. Time to cut the bunting flags. Cut your linen strips at approximately a 60 degree angle, then mirror the cut on the other side for a triangle flag. Alternate wide parts at the top and bottom to get maximum usable pieces out of your linen.

5. Before attaching the flags, stamp them with your ink of choice and the alphabet stamps. This way, if you mess up the stamping you can simply cut another piece of bunting.


6. Once you’ve stamped the bunting, lay them out before gluing to determine your spacing. Once you know how close they need to be (or how much they should overlap) then use a thin line of hot glue to attach each pennant on top of the ribbon. The linen does have holes, so be careful not to over-glue or press too hard when the glue is hot or it will seep out the front.
7. You’re done!

Be sure to check back next week for more cake topper DIYs – get excited for glittery tiny top hats, and balloons! Another amazing DIY tutorial from Ribbons & Bluebirds!
[icon size=”small” image=”icon-heart”]


1 comment