
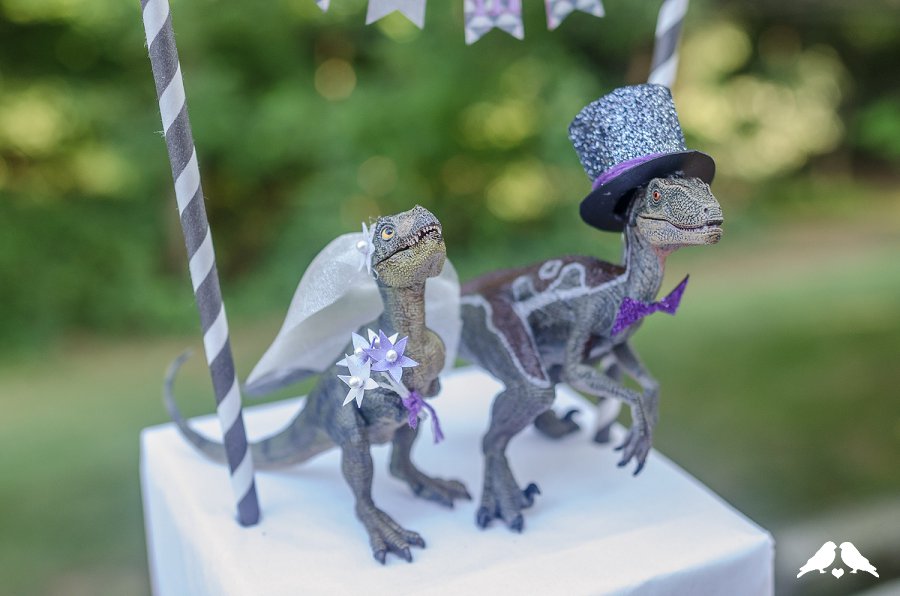
What two things could make your wedding cake extra awesome? Why, mini dinosaurs and dapper top hats & veils OF COURSE. Continuing with our DIY Cake Topper series with Ribbons & Bluebirds (click if you missed the DIY mini bunting cake topper tutorial), today we have the most rad DIY wedding tutorial: Dapper Wedding Dinosaur Cake Toppers (with Top Hats & Veils). Check out the tutorial below!
DIY Tutorial: How to Make Mini Dinosaur Wedding Cake Toppers
^I MEAN COME ON!
You will need:
Tiny top hat, from Ann Wood’s blog: http://annwood.net/blog/2009/09/17/tiny-tophat/ (Template for top hat, available on Anne Wood’s blog)
- black construction paper/cardstock
- scissors or x-acto
- manicure scissors ( for trimming the little curved bits)
- white glue
- floral tape
- large paper clips
- a light color pencil
- a dowel or something for curling the poster board
- black glitter
Bowtie
- black construction paper
- glue
- black (or coloured) glitter
- X-acto knife
Mini Flowers
- Floral stem centers
- Scrap paper in colour of your choice
- X-acto knife
Veil
- Scrap of tulle, about 2×3”
- Mini flowers, with no stems
- Scissors
Assembly
- Figurines of your choice
- Hot glue gun
- Embroidery floss or twine
INSTRUCTIONS:
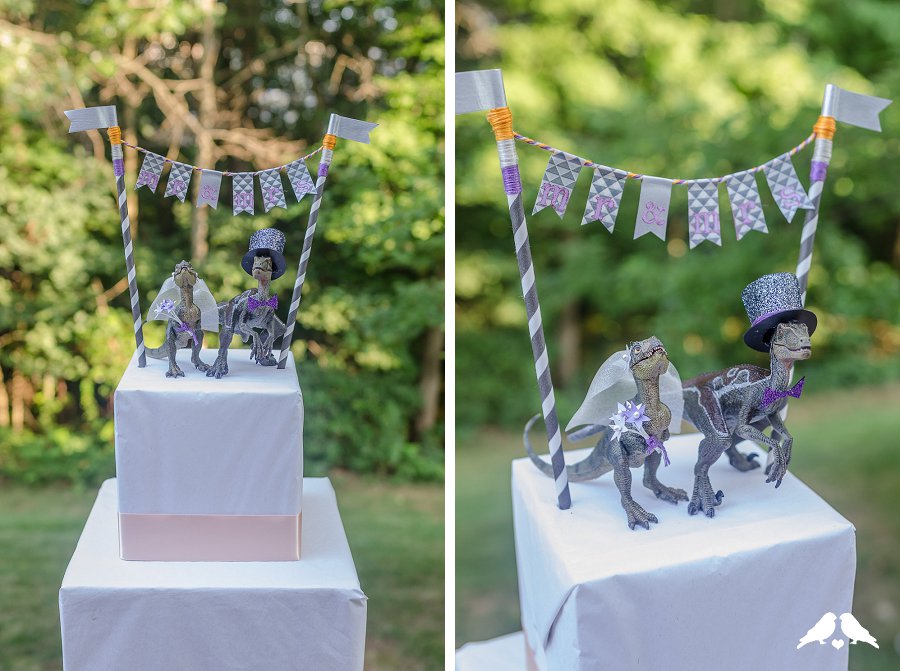
When I was wedding planning, one of the things I was excited to make was my cake topper to go along with the beautiful cake my roommate was going to make for the big day. I really didn’t want to use one of the weird plastic people designs, and since I was already arranging all my flowers myself I wanted to go in a different direction. And then I found this amazing tutorial, and all my problems were solved – I had 2 bluebirds in a nest looking all primped and polished with their tiny top hat and veil! Today I will show you how to style a different pair of figurines sure to delight your guests: meet Dapper Velociraptor and Elegant T-Rex.
Steps:
For the top hat:
1. Visit Ann Wood’s amazing blog, and download the pattern to make the top hat: http://annwood.net/blog/wp-content/uploads/tophatpattern.pdf
2. Follow her instructions to make the top-hat, and cover in glitter. I’ll meet you back here when you have an awesome top-hat all finished
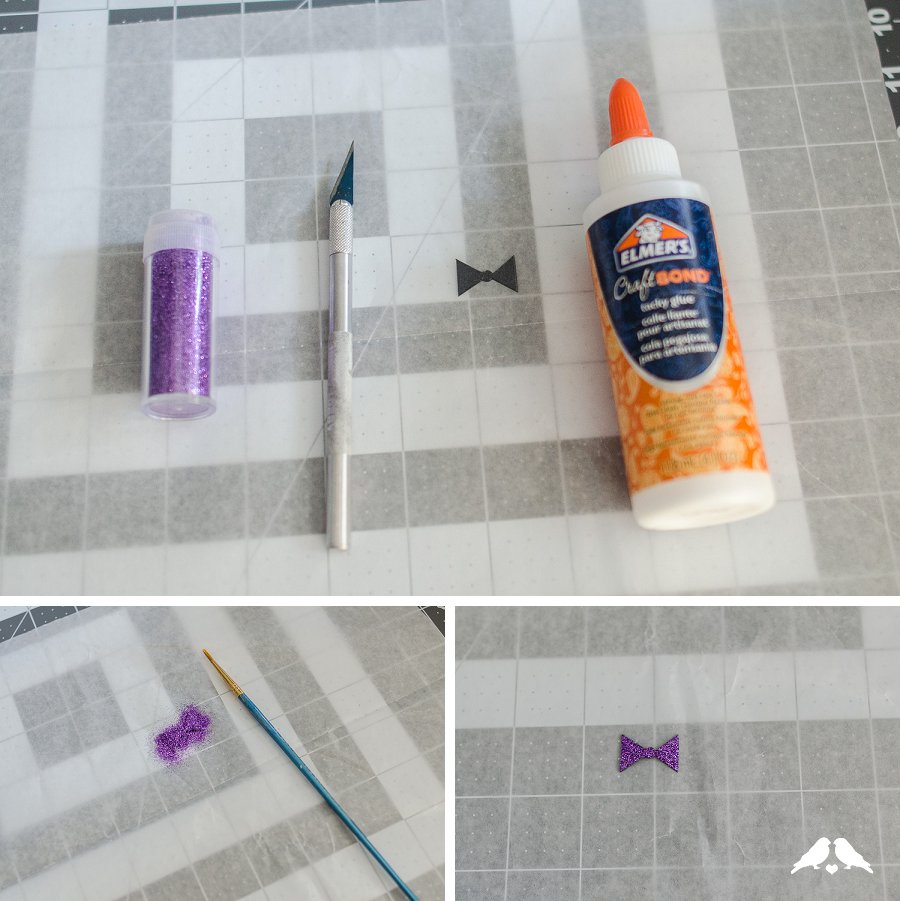
For the bowtie:
1. Cut out a bowtie shape from the construction paper with an x-acto knife.
2. Cover bowtie shape with glue, and sprinkle with glitter. Let dry.
Click inside for the rest of this step by step alternative cake topper tutorial!
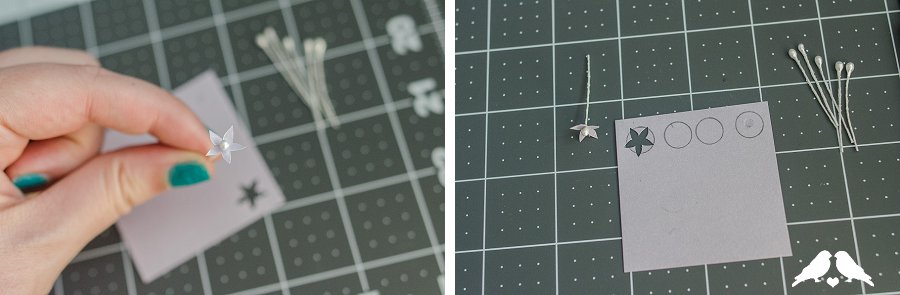
For the mini-flower bouquet:
1. Cut your floral stem centers in half, to get single-ended centers about 1” long

2. Take scrap paper and draw ½”diameter circles on them. I use these as guides for cutting the petal shapes.
3. Carefully cut petal edges around your circles. While the flower shapes are still held inside the overall sheet, cut little tiny “x” lines in the center to allow the stem to poke through.
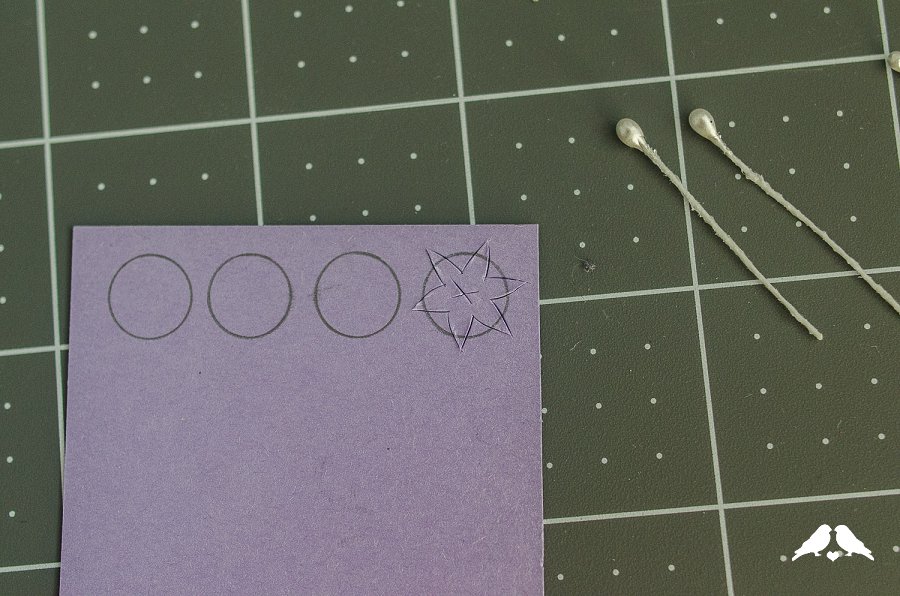
4. Pop out the flower shapes and poke the floral center stem through the “x”. Push up to the beaded end of the stem until the paper is held in place by the widening stem.
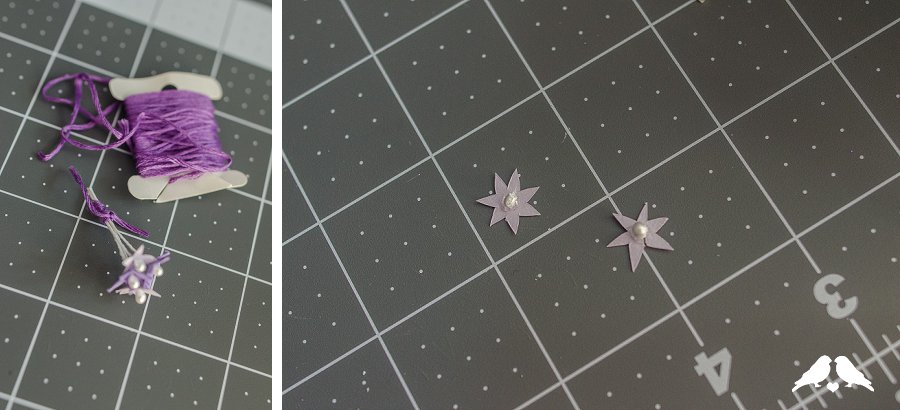
5. Tie 4 flowers together with twine to make a mini bouquet.
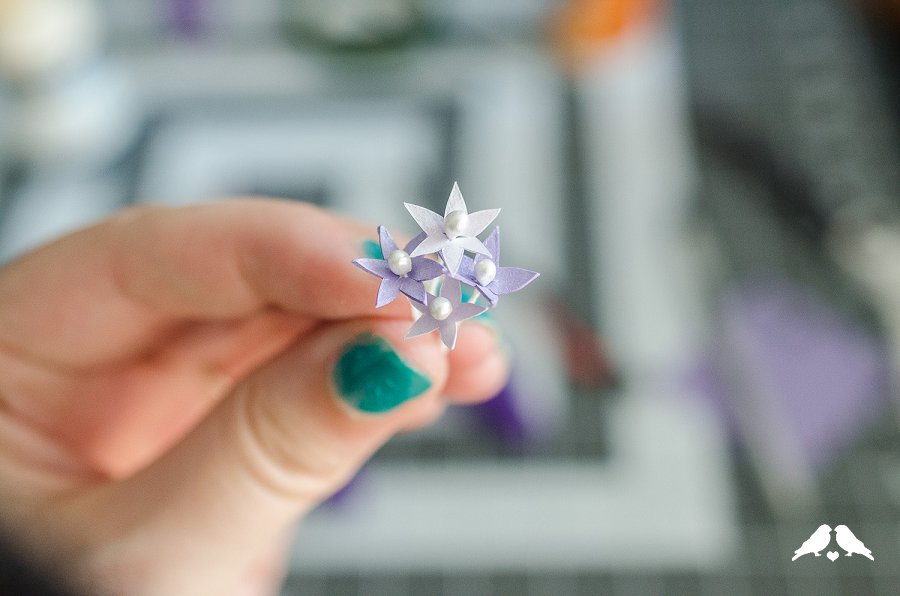
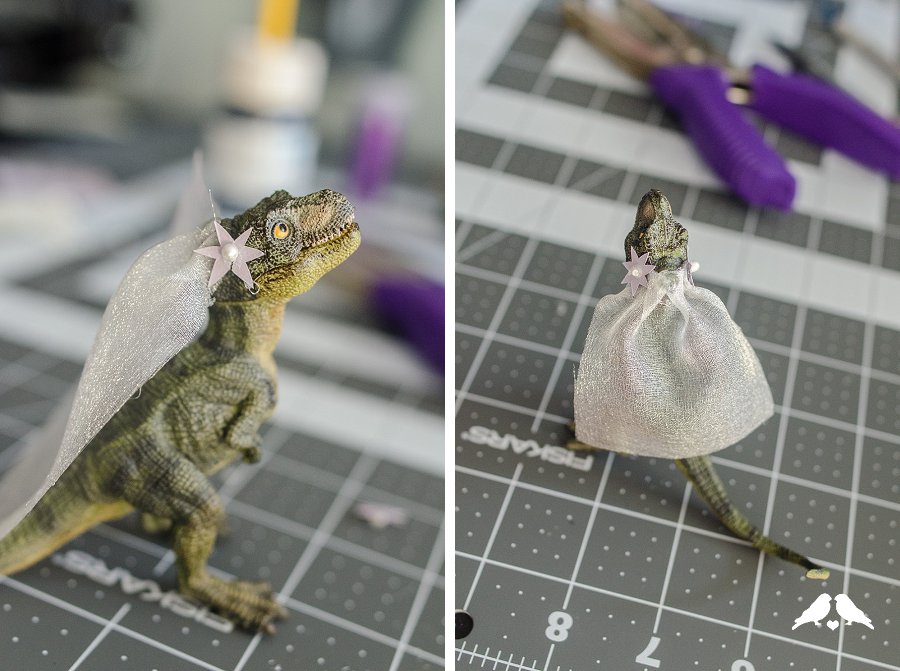
6. For the flat mini-flowers for the veil, don’t bother to cut the “x” in the center of your flower. Take the floral stem and cut the beaded end off about halfway up the bead, giving you a flat surface. Hot glue the beaded center to the middle of your flower shapes (you may find tweezers helpful.)
For the veil:
1. Cut a piece of tulle about 2”x3”. Take your hot glue gun and place a glue dot in the center of the back of your figurine’s head, where you’d like to start the veil. Attach the tulle to the hot glue.
2. Just to the right of the first dot, place a second dot of hot glue. Folding the tulle back over towards the middle, press into the hot glue then immediately fold back over and press, creating a pleat.
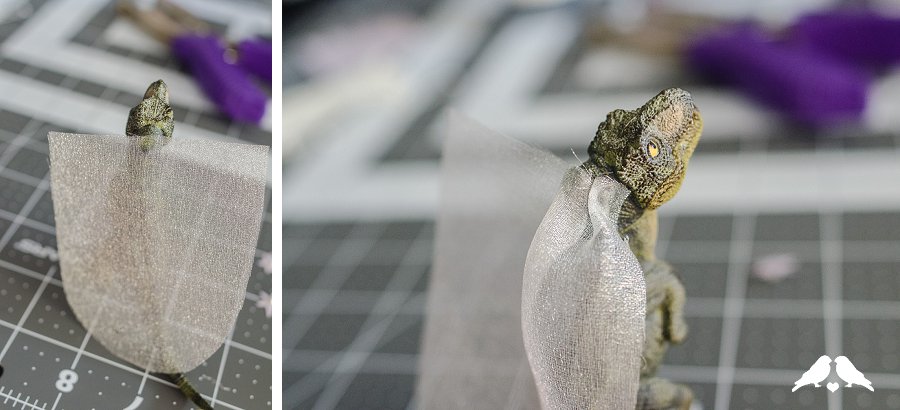
3. Repeat once more on the right side, then twice on the left to create the pleated veil. Trim the veil to your desired length with sharp scissors.
Assembly:
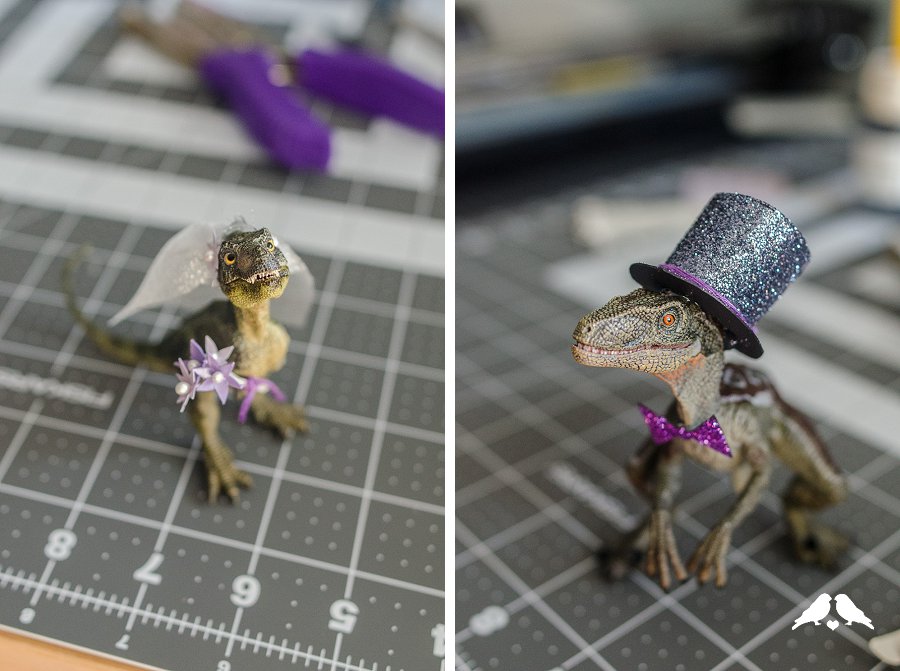
1. For a dapper gent figurine, use hot glue to attach the top hat and bowtie onto your figurine after dry-fitting to determine where you’d like them placed.
2. For a lovely lady figurine, use hot glue to secure the bouquet to her hands, then two small dabs to secure the mini-flowers to the end of the veil.
Done! You’ll notice how great these two look under a variation of our first cake topper tutorial, the bunting banner! You could use ANY figurines for these, tuned to your personal style. Enjoy!
HOW FREAKIN AWESOME ARE THESE?!?!? Let us know if you guys come up with something equally awesome! A very special thanks again to Ribbons & Bluebirds for sharing yet another awesome DIY wedding tutorial!
[icon size=”small” image=”icon-heart”]


5 comments
This is THE BEST diy tutorial I have ever seen! I already have my neon dinosaurs painted…gotta get to work on that rad as hell top hat! :D
awww thanks Maggie!! Neon dinos would be amazing – excited to see photos!!
you better share them when they are done!!!
I love these, but – Is there a dino cake topper that would be wedding in-appropriate? Dinos doing it doggy style?
Lol this is TOO CUTE.