Hi everyone! Wendy here from Weswen Design. I am so happy to be a guest blogger on Capitol Romance! Since I’m blogging on DIY Wednesday I thought I’d pass along some helpful hints and tips for you ambitious DIYers out there interested in DIYing your wedding invitations. As a wedding stationery designer with nearly ten years under my belt, I’ve learned many things the hard way. I’m here to ensure your DIY adventure is perfect by sharing some nitty-gritty details that will help keep the process smooth and painless!
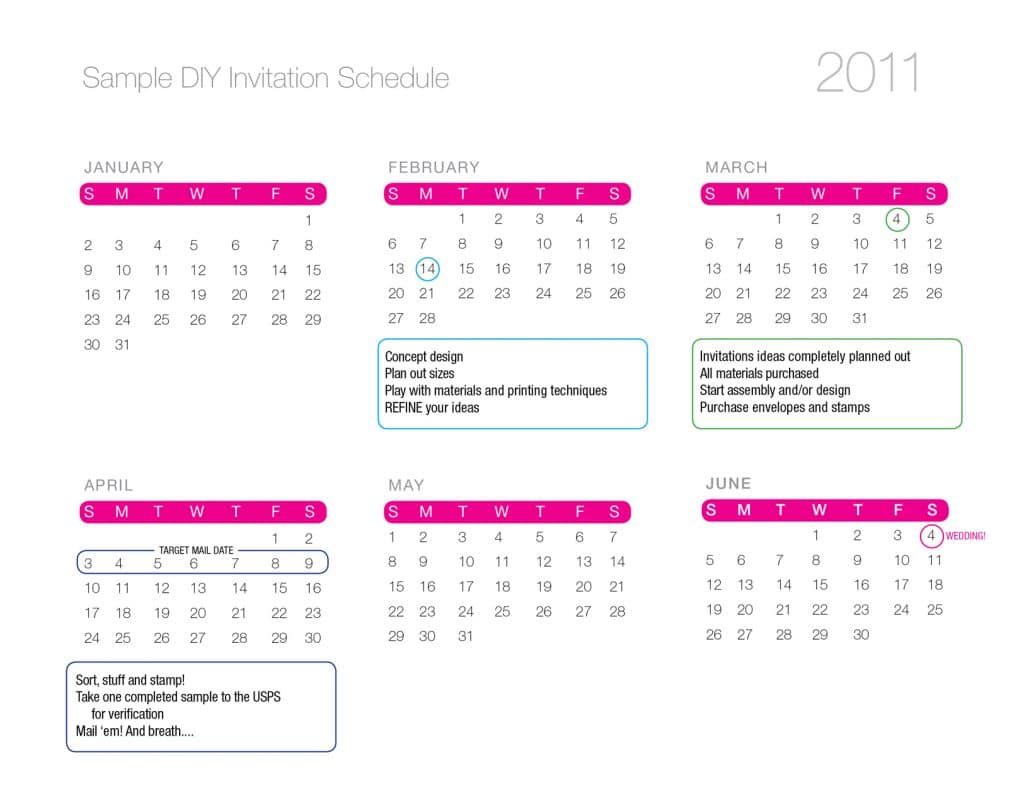
The number one thing to remember when doing your own invitations is the TIMELINE. To figure out when you should start your invitations, work backward from your wedding date like so:
Wedding date >> minus 2 months (since invitations should be in the mail about eight weeks out) >> minus 1 week for addressing envelopes/stuffing (more time if your having calligraphy) >> minus 2 weeks for printing and/or assembly >> minus 1 month for purchasing materials/brainstorming/design = the date you should start!
Sound confusing? Check out this calendar example with a wedding date of June 4th. Note the tasks that should be completed within each month and circled targeted dates.
If you think you can get everything done in a month, give yourself two. The last thing you want is to be stressed over getting the invitations in the mail in time and then doing a sub-par job. This is, after all, like the Queen Mother of invitation jobs. Plan accordingly and take your time!
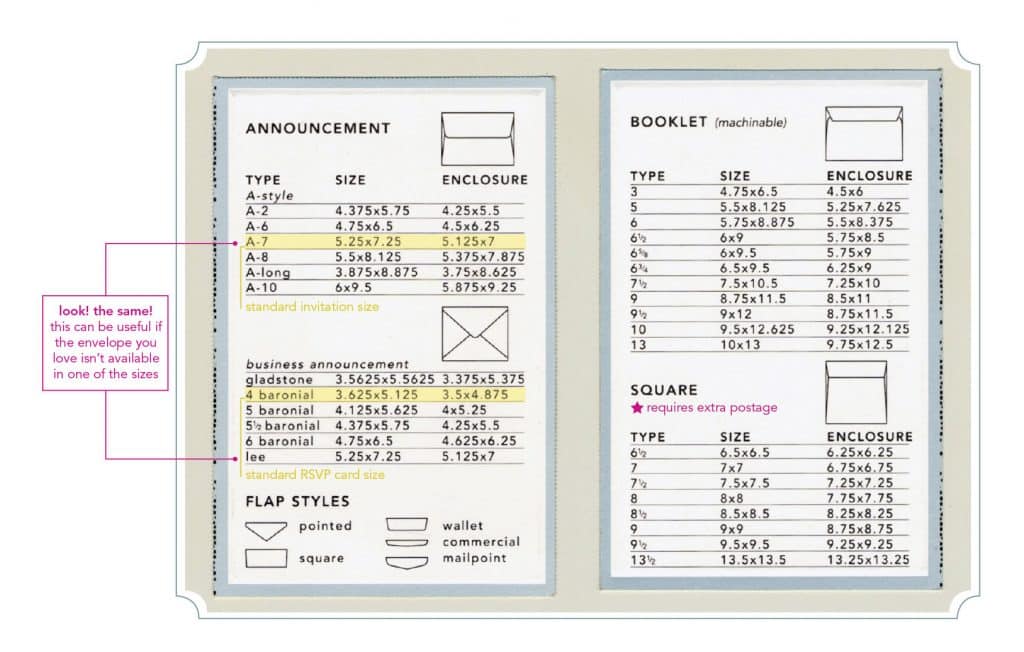
The next most important thing you need to determine is the SIZE OF YOUR INVITATION. This might seem like a detail that doesn’t need to be thought out so soon, but trust me, it does. Here’s why: you have to make sure you’re creating your invitation to a standard envelope size. In all actuality, you might even want to pick out your envelope FIRST, and then work backward from there with invitation sizing. No point in designing your invitation to match perfectly with a shimmery A7, only to find it won’t be available when you need it.
Keep in mind, the standard invitation size is 5 x 7. Thus, the corresponding envelope you would need would be an A7. But standard-schmandard…. feel free to get creative and do something out of the box! Just remember, out of the box often = more money at the post office (this coming from the designer who paid $1.17 for each wedding invitation we mailed. It’s okay, it was worth it!)
To keep things super simple (that’s what I’m here for, right!?) here’s a handy dandy size chart:
And, when in doubt, read up on current mail regulations on the USPS website. All sorts of sizing information is available here.
Finally, for today, consider your POSTAGE when picking your invitation size. Remember that:
- Square envelopes cost more to mail (refer to chart above)
- Anything not machinable and will cost more to mail
- Don’t forget to add postage to those RSVP envelopes! Or,
- Postcards stamps cost: $.28 and could be a good way to cut corners for the RSVP card.
And always always ALWAYS take one completed invitation—envelope(s) and all—to the post office before you mail to have the correct amount of postage verified. I literally had nightmares that I would open my mailbox a few days after sending out all our wedding invitations, only to find them all returned to me for some silly reason. NOT fun when you’re supposed to be getting your beauty sleep.
Next time, we will talk about different printing techniques available and which one would be best for you and your budget. Plus, what are the common information cards that accompany the invitation and which one(s) do you need….. hope to see you next time!
In the meantime, if you’re a DIYer and have a question you’d like answered, please email me at: wendy@weswendesign.com.






3 comments